|
|
|||||
Advertisement By the way, if you're wondering why the story pages of my site still look this this, and the main homepage is completely different, it's because I redid the homepage back in September to save bandwidth when I had the Xbox 360 laptop story. It didn't work anyway, so now I've got a discombobulated site that I've yet to fix. Now that I've cleared THAT up... Alright, yes, my new Xbox 360 controller. Well I've actually had requests like this before but it wasn't until the most recent one that I actually did it. (BTW keeping in good email contact with me helps ensure I consider you custom projects) So I thought "This time I'm gonna build the thing!" and not put it off any more, like I have been with putting handles on my custom laptops. (The next one doesn't have one either, but the one after that will - I swear!)
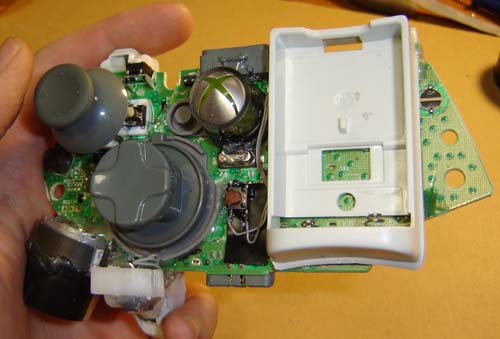
I've actually always wanted to build some helpful devices for people with disabilities, I know that sounds completely different than the stuff I usually do (you know, like Xbox laptops and ghost documentaries) but I see it as an interesting challenge. Here was my chance! First I bought and gutted an Xbox 360 wireless controller. I shall take this opportunity to say that after the debacle of the bowling-ball sized Xbox 1 controller the new 360 model is possibly one of the best controllers ever. WTG Microsoft! FTW! Strangely enough, the controller used security torx screws with a shaft in the middle. (Security screws are the kind that are supposed to be hard to remove, like the ones in the public bathrooms that prevent you from taking apart the door while you take a dump) This is odd because the screws on the 360 itself are normal. So, as I did in a recent Engadget How-To, I simply Dremelled (if that isn't a word it should be) a slot in the middle of a cheap torx bit so it could fit over the shaft and remove the screw. You can also break off the little shafts pretty easily with a thin flat-head screwdriver.
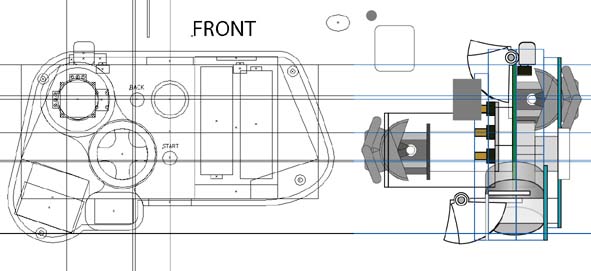
Next I had to rearrange everything inside the controller. This actually took me quite a while, I think I went with 3 revisions on the design. Eventually I settled on manually reattaching all the buttons to the controller's circuit board and then designing around that.
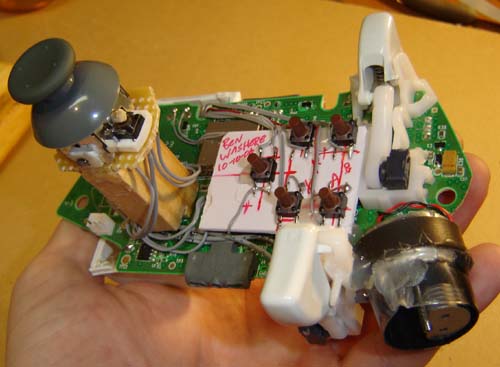
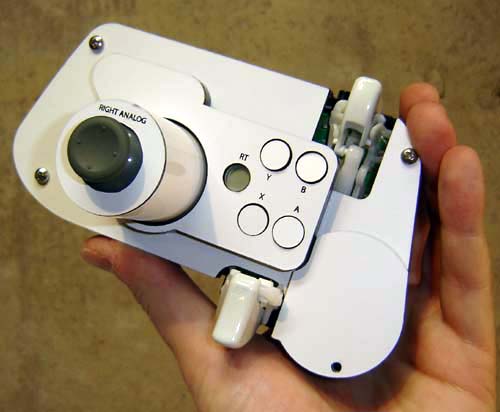
I managed to get both rumble controllers on this thing because I didn't want to accidentally build a Sixaxis. The right analog shoulder button has been moved down and flipped for use with the pinky finger. The X Y B A triggers, along with right bumper, have been rewired with tact switches to the middle for actuation by the middle and ring fingers. The left analog trigger and left bumper have not been moved. It will take some getting used to but everything is within reach. Pulling the right trigger with the pinky isn't that hard, though who knows after a marathon of Oblivion rat-killing what could happen.
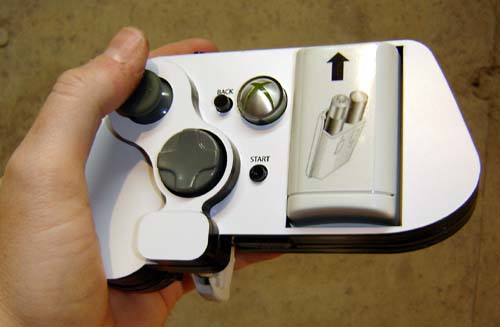
Here's a better view of the front. I cut the battery holder out of the original controller shell and wired it to the front of the unit. Almost everything is put together with what I now like to call "thermal prototyping gel" - the compound formerly known as hot glue. It looks kind of scattershot but I actually spent a lot of time getting this all to work. I like to run movies and commentaries off my laptop when I do this stuff and in fact I recall getting through most of Battlestar Galactica season 1 during all this. (In case you're wondering, the movies I listened to the most during my ORIGINAL Atari 2600 hacking back in 2000 were The Good, The Bad and The Ugly and Star Trek 4. There, that'll help you on Jeopardy) One of the biggest challenges, at least in the brainstorming "how I am going to do this?" phase was how to do the right analog stick. Then I realized I could just put it on the bottom of the controller and reverse its wiring. You don't actually tilt the controller on the axis of the stick because that would be awkward. (Believe me, I tried) Instead you actually just move the whole thing in the direction you want for the right stick, and the analog stick then rotates against your leg. This is why you have to reverse the wiring, because the use of the stick itself has been reversed.
Here's the back of the unit, with the new buttons placed on. I didn't really have room to use the original Xbox buttons so I just made some new ones. They're labeled so it should be OK. Unfortunately some of the trigger mechanics are exposed, so be sure not to get any Doritos in there.
There you have it - the story of how I literally cobbled this thing together. Stay tuned to Benheck.com for even weirder controller mods, new projects and swell podcasts! Feel free to email me about this project if you'd like to help me pursue things along these lines. I would like to see what sort of support there would be for something like this.
|
|||||