
A friend of mine asked back in May “Can you build an Xbox 360 laptop?” And I responded “Sure, can you pay for it?” He agreed, and thus I set forth on what was surely to be my most complex and insanely ridiculous videogame project yet. (I say videogame project as I highly doubt I’ll ever manage anything as complex as Port Washington again, though at times this project sucked my will to live about as much)
With my first batch of “venture capital” in hand I ran off to the nearby store to get myself an Xbox 360 Super Package, or whatever the $400 version is called. While I won’t mention the game store I stopped at by name, I will recreate the amazing conversation I had with one of their employees…

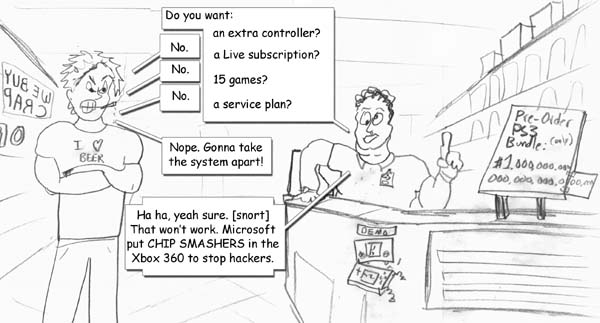
Sadly, only my side of this conversation is exaggerated.


Several years passed by, but I finally had the Xbox 360 free and clear. I hightailed it out of there, vowing never to return. Now I could get to work! (I hope the CHIP SMASHERS don’t get me)
Please note, this story was assembled as I worked on the device (as opposed to afterwards like I usually do) so sometimes it will branch off in different directions and have the topic shift rapidly. However, this accurately represents the workflow, more so than other articles I’ve written.
Dateline: First Week of June ’06
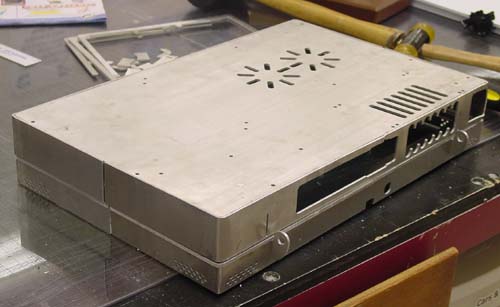
After FINALLY snagging the 360 I brought it home and immediately tore it apart. I didn’t even test it out – I mean why bother? I’ve played quite a bit of 360 already, I was more interested in the guts of the thing. (I can always eat rat meat later)
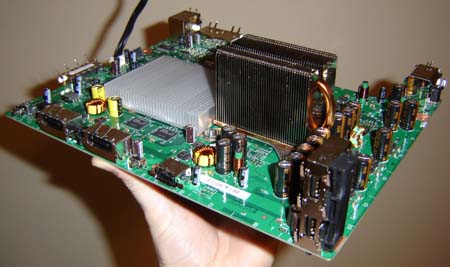
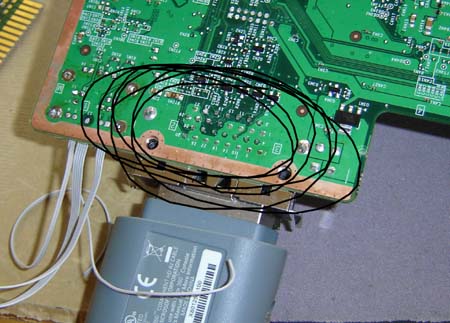
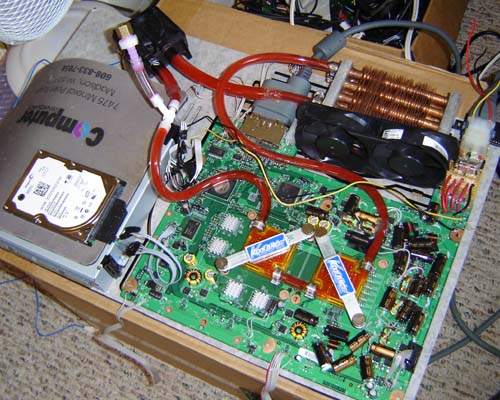
The stock Xbox 360 motherboard.
Using a handy “how-to” on the Internet I had the thing taken apart in under 10 minutes. Half the time was looking for my lost Torx bits, until I realized there were some in my precious ratcheting screwdriver. Anyway, I looked over the motherboard to see what could be “flattened” to make the thing thinner (Heat sinks didn’t count as I was planning to replace them with water-cooling) The obvious choice were the numerous large electrolytic caps. (black cylinders in above photo) As with many systems I’ve worked on, I de-soldered them all and reattached them laying flat. In most cases I had to extend their leads to make this work. Oh well.
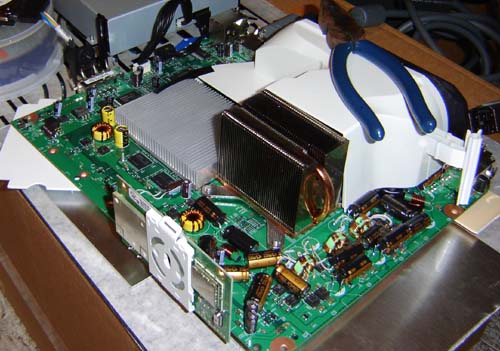
Flatten capacitors.
Above you can see the board with the flattened caps. (That’s the cool, hip, geek slang term for capacitor you know) There are also several wound torrid coils on the board (yellowish things to the lower right of the tall heat sink) that would be a real pain to move so I left those standing as “the highest things on the motherboard” Still it’s not too bad, with the exception of the power port on the back nothing is more than 1/2″ above the motherboard now. You might also noticed I’ve also removed the front USB and memory card slots at this point. The front side USB connections will go to the keyboard / extra USB ports while the rear port will be used with the Wi-Fi module.
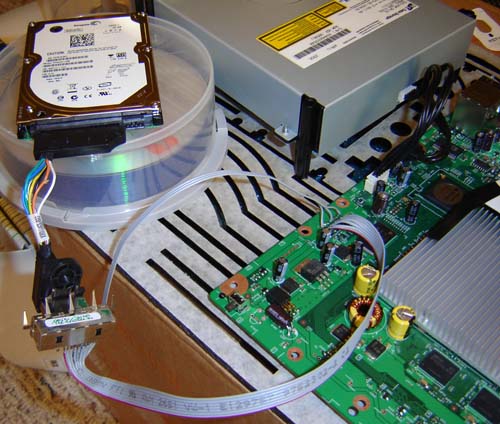
Extended hard drive SATA and power connector.
In my tentative system layout the hard drive is moved a good ways from the original connector. Since the stubby cord inside the Hard Drive Enclosure is, well, stubby, I had to see if extending the SATA cable was possible. The least destructive way of doing this was to de-solder the connector from the motherboard and extended between them, as seen above. The idea of extending the SATA cable with old parallel IDE cable was a bit humorous, to me at least. Naturally I didn’t copy every connection, since +5 and Ground are on there 3 times each. Why have excessive cabling?
I did a test boot and watched one of the videos off the drive (you know a system is quality when it comes pre-loaded with James Cameron) I then played games for about an hour. Nothing exploded or melted a hole through my floor so I think we’re good. I now feel OK to extend the DVD drive’s SATA if required – the existing cable is about 3″ long, but most replacement cables are 2′ minimum. I was worried when I read SATA doesn’t use TTL, but apparently it doesn’t exactly use magic either, so it’s still hackable. In the final version I’ll attach the gray ribbon cables directly to the colored wires coming off the hard drive’s connector, skipping the Microsoft plugs altogether.
This ends Phase 1 of the project. Next step – water cooling! The parts are on the way, I’m a bit worried about the pump though. It’s the smallest we could find, but it’s still big (for a project like this) Depending on its size I might have to build a new DVD drive loading system, just to make everything fit. Also in the experimental realm is the custom radiator I plan to build. The plan is it’ll fit in the space at the rear of the motherboard where the fans were, then external fans pull air through it. The idea is to put tubing in all available empty space to increase the volume. Some of the tubing might even be exposed around the case for decoration and cool backlighting. But will it run cold (I mean NOT HOT) enough?
One consolation I have for this step is the massive heat given off by the ‘sinks in the standard configuration. Sure they’ve got that fan that sort of pulls air past them, but still the GPU especially gets REALLY hot. Lacking an infrared thermometer I can only compare it to things. Hm… How about when you microwave a bowl of something and the bowl’s so hot you can only carry it for about 1 second before setting it down? Yeah, that’s about right. (Don’t ask me what that is in Celsius) The worst thing is that’s what it’s like running open air as shown above, I can only imagine how hot it gets in that case. Maybe Microsoft could sell a coffee warmer attachment or something…
Dateline: June 5th, 2006
My plan for the custom radiator is 20 1/8″ pipes that split the main water tube 4 ways. Thus, each of the 4 paths goes through 5 of the tubes in the radiator circuit. Also by having an odd number of tubes for each path it ensures the output is at the opposite end of the input. Finally all of the tubes are mounted through about 32 thin aluminum fins. The week I tried this I was unable to get any aluminum CNC machining done so I could only test the very basic idea, as shown below.
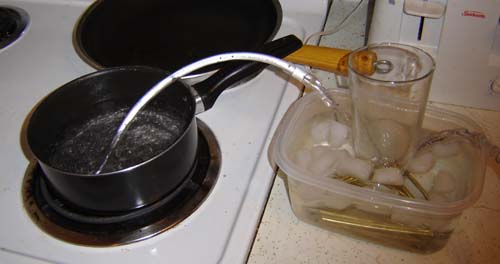
First tubing test
Surely not the best test but oh well. It could be done with, and I quote “common household items” There’s 4 lines of interconnect brass tubing with 5 4.5″ long links each. This was placed in a tub with ice water and held down with a glass. Then the 4 lines combine into a 1/4″ tube at both ends to represent what will be coming off the heat sinks. Finally I put one end in, ahem, a pot of boiling water and sucked on the other end. The water came out, well, not AS hot so I guess this sort of works. I plan to use aluminum tubes for the actual unit, and of course the fins.
Dateline: Middle of June ’06
On a muggy Friday the once-shrouded-in-mystery “pump” arrived. It was as large as I feared, granted it might seem small inside a min-tower computer case, but for my scale of work it’s gargantuan.
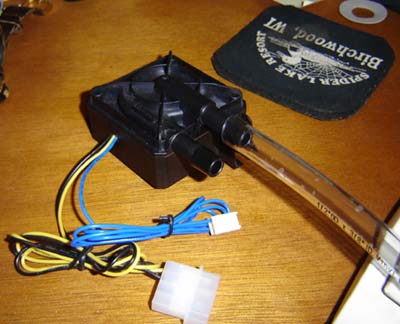
Middle: the pump. Upper right: the best felt coaster I’ve ever stolen from a bar.
Well at least now I could draw it into the computer and arrange things in the case some more. However the watercooled heatsinks haven’t arrived yet so I’ve decided to move onto other things, namely the keyboard and the screen.
The Keyboard
Now I realize a keyboard for the Xbox 360 isn’t exactly the most useful thing in the world. Sure, you can enter your profile name with ease, or fire off messages to your buddies in the blink of an eye. But other than that, mostly pointless. (Unless of course they offer mouse and WASD support…)
Still, this being a laptop a keyboard makes sense, plus there’s all that empty space there when you open up the unit so yeah, why not put a keyboard in? At the local used computer place I found a cheap Gateway “multimedia keyboard” which, more importantly, was USB only. It also had the bonus feature of a hub / 2 extra USB ports, so this not only “replaced” the USB port used by the keyboard but added one as well. The other front USB port on the 360 I plan to use as the third USB port, and the rear USB port will be for the Wi-Fi. You can even plug in extra 360 controllers to a ‘hubbed USB port – pretty handy.
I knew the keyboard in its stock form wouldn’t work with my plan, but at the same time I wanted to avoid the sheer horror of manually rewiring the matrix under the buttons as I did with the Atari 800 laptop. So I kind of went in-between. Ok, so inside the keyboard is a silicon mesh containing domes that provide the soft feel…
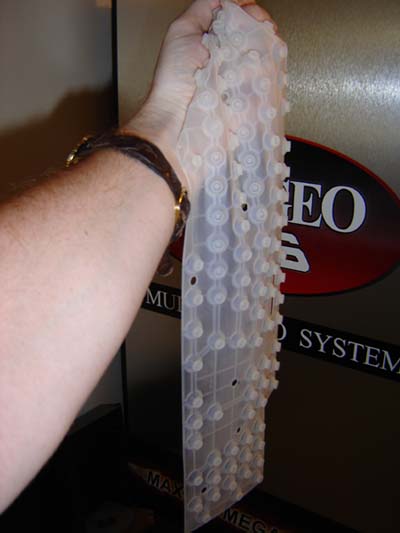
Presenting the world’s first octopus skin-grafting material.
When you push a key, these “domes” smash down on a really cheap 2 layer plastic “matrix” with a slight gap in-between the layers. Pushing a spot makes the layers touch, and the conductive material registers a key-press. You can see a scan of this plastic below.
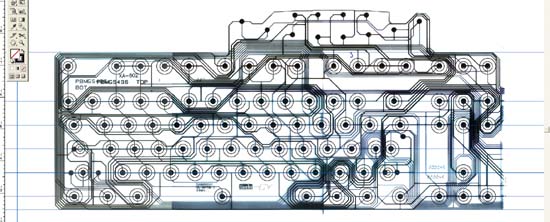
The keyboard matrix. “Whoah” With vector key positions laid on.
Of course the circuit board to control the keyboard was above the portion I needed to remove, specifically the number pad (Which doesn’t seem to work on the 360 anyway) Since I couldn’t just slice off and rewire that part of the plastic matrix, I choose to fold it behind the rest and attach the board there. The bright side of this was I finally had a use for all the thousands of phonebooks I get each year…
I find it quite ironic in an area that’s all gung-ho for ‘conservation’ and recycling that I get this many phones books in about 14 months.
As of this writing the phones books of rain-deforestation have been smashing the bend in the plastic flat for 5 days. A few more and I’ll be satisfied. Then I can take this crap up north next week and use it for 10 complete campfires. Anyway, as seen above I scanned the matrix into my computer and then laid out the button arrangements over it. I cross-referenced to actual measurements of the spacing so I’m confident it’ll work. With the time I saved using this cheat I was able to work on the screen! (Insert ominous music here)
Dateline: Slightly After the Middle of June ’06
The Screen
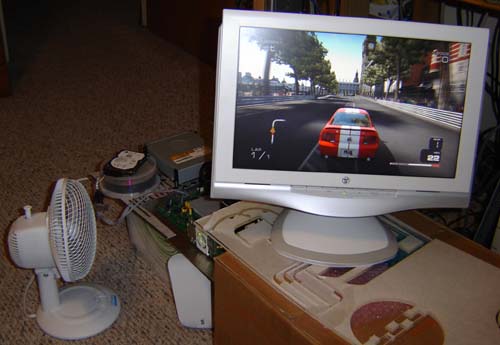
I have to hand it to the dude who’s commissioned this project – he’s willing to do it right. (Unlike people who ask me to make arcade machines out of Game Gear screens for $5 and rubbish like that) Pretty much from the get-go we decided this sucker would have not just a screen but a high-definition wide screen. My reasoning to him was “this is already costing you an arm and leg, why not throw in a kidney?” Or something like that.
I had heard legends and myths that the 360 could output VGA resolutions but how? Oh of course, by purchasing a cable I’m sure… yup, $39.99 it looks like. Luckily I had an Xbox “pinout guide” that revealed how it works…
From this badly circled spots, all you [Xbox 360 video related] dreams can come true. (Expect the HDMI ones)
Shown above is the soft white underbelly of the Xbox 360’s audio video connector. Connected to it is the standard TV/HDTV connector which, as we all know, is guaranteed to get switched to HDTV every time you try and pull it out. Anyway there’s 30 or so pins on this connector, and all sorts of stuff comes out to this plug – RGB, Composite, Sync, even SCART-style signals. 3 of the pins are used to tell the console what mode to render/output in. The basic setting are Composite, VGA, HDTV/Component and RGB Scart – it just depends which of the 3 pins is tied to ground. Typically this is done via the connector or the switch inside it. When you’re hacking the console you can have your way with it as you please.
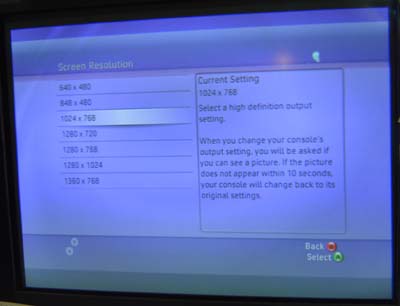
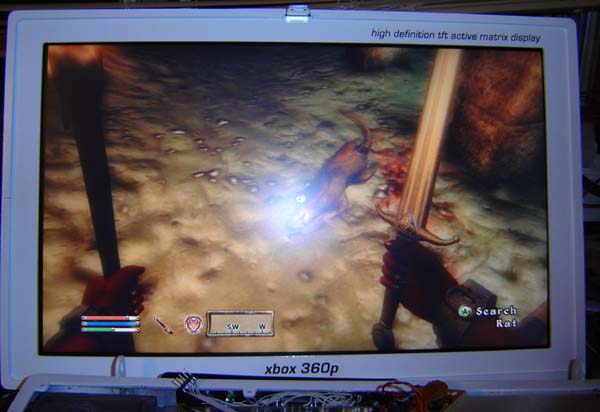
The hacked VGA on my monitor. (I had to crop the shot so you couldn’t see all the Post-Its with passwords I have laying around) Anyway, note how all sorts of resolution choices pop up.
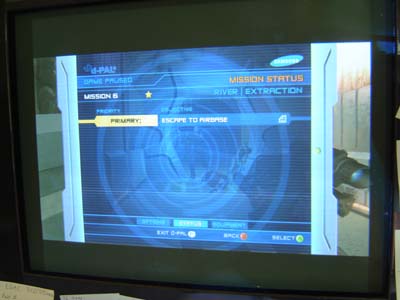
A screen cap of the underwhelming sequel to my favorite N64 game. Sigh. Anyways, with my 4:3 monitor set to 1280×1024, the game itself is letterboxed, while Dashboard is full screen. Note how you can see the 4:3 standard sized “safe area” in the middle and the extra widescreen stuff to the sides.
Originally we were looking for a small, 15″ diagonal HDTV set but realized this was a bit silly. There were a few out there, but nothing that looked very promising. Then I came across a Westinghouse model widescreen LCD computer monitor at Best Buy. It was pretty much perfect – small enough to not enlarge the laptop too much, widescreen, and with a native resolution almost exactly that of the 360’s default internal render of 1280×720 (720p HDTV) Another bonus is that VGA RGB is better than the component HDTV signal as it has actual true RGB signals and not one but TWO syncs – horizontal and vertical. Whereas component is actually plug 1=Brightness and composite sync, plug 2=Red minus Green and plug 3=Blue minus Green. Still a pretty good signal, but a little more “mushed” than VGA RGB.
(Unfortunate note: The LCD display had a DVI input but the Xbox 360 doesn’t seen to support that yet. Nuts. Oh well, I’d be no better off with the $500 PS3 😉
If only George Westinghouse was here to see this… although he’d cry to learn it was DC inside.
Sadly I was not able to play Project Gotham Racing very long – the screen HAD to come apart!
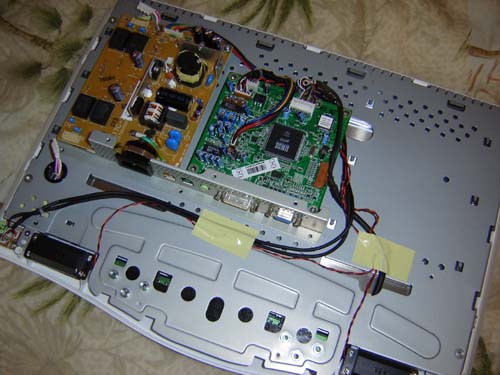
The guts of the fairly reasonable LCD.
After cracking open the case I saw what you see above. 2 circuit boards and a bunch of aluminum holding the glass itself. One concern I had when scoping out and measuring the unit on the store display was the AC wall power input on the back. I was kind of hoping for an external adapter and a simply +12 volts into the unit. The reality once inside wasn’t TOO bad, the lamp inverter (leftmost), power supply (right of that) and main video control board (center green thing) The main problem was the power supply was on the same circuit board as the inverter.
The back of the inverter / power supply circuit board.
It’s a problem because the inverter is the thing that fires up the lamp to light the screen and it had to be behind the screen, along with the control board. But I certainly didn’t want the power supply behind the screen, mostly because (unlike the inverter and control circuitry) it’s much too much and secondly, you’d need a second wall power plug going into it.
I tried running +12 volts into the board cold-turkey, but couldn’t get it to work. So I took a long bike ride (which for me, when it comes to activities that help with figuring out problems, is right up there with driving, taking a dump or scribbling on bar napkins) and decided to build a combo 360 / screen external power supply (the 360 supply was going to be external from the get-go) and run the required +5 and +12 signals along with the 360’s main power into the back of the unit. If you look at the photo above, you can sort of see how the circuit is in different sections. All I had to do was figure out which section was PSU, which was inverter…

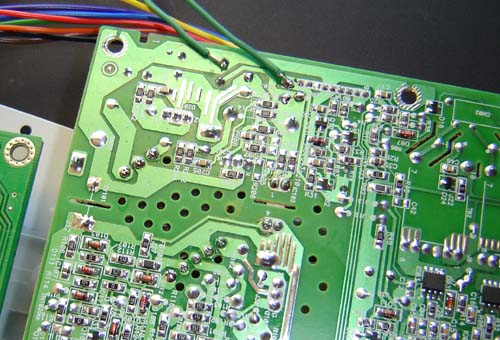
CRACK! (Not the actual sound it made, but more dramatic)
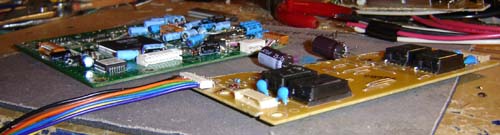
…and split the sucker in two. As shown above. On the left is the thicker power supply, which I will merge with the external Xbox 360 power supply, and on the right is the lamp inverter, which will go behind the screen. The key in this was discovering that all connecting these two parts were 2 fuses – one for the +12 volts and one for +5 and of course ground.

The screen still works, great I didn’t waste any money today. Except on that jar of Magic Shell.
I tested the unit by running (3) 6 foot wires off the power supply (upper right) to the display (the inverter and control board mounted behind it) As I expected it still works, so I think I’ve licked the problems of the screen. The long wires I bought are a bit too thick, I’ll probably replace them with lower gauge for the final unit, but for the test I wanted “to be sure”
Above you can see the control and inverter boards for the screen. I have “flattened” them through de-soldering to reduce their overall height. The biggest parts on these boards are usually the electrolytic capacitors, the blue things that I’ve laid flat, but I also changed some plugs to insert at right-angles instead of top-down. The goal here is to keep the screen portion of the laptop as thin as possible, at least an inch or less, possible down to 3/4″. We’ll see….
Now… on the Final Potential Project Wrecker – the water-cooling tests! If I can get this part working it’s smooth sailing. (If not, well I’m screwed) I’ve had some new ideas since the, um, “research” shown at the top of this page. Will it work? Find out!
Dateline: June 27th, 2006
The original plan I had for the radiator has been thrown out the window. Well, not how to make it but what size. The thing is, the size of the screen I bought increases the overall size of the case, thus, I have more room for things. The obvious benefit is a bigger radiator using larger tubing.
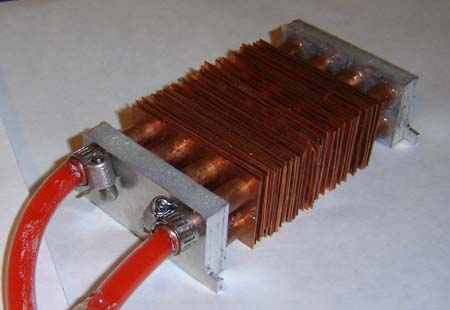
The radiator of myth and legend
I am definitely one of those “why buy it when you can build it for twice the price?” kind of people, although with the exorbitant pricing of anything water-cooling related this custom radiator was probably a bargain. OK in the case I have an area of about 2.5″ x 1.5″ x 5.5″ in which to put the radiator. Basically in the area in which the original fans sat, but twice as deep. After looking for some radiators online I realized nothing would fit that area as I pleased so I immediately jumped – much to the chagrin of the client – to the idea of making my own radiator.
The controversial part of my design was the lack of bends in the copper tubing. These would take up space and increase the size of the unit, or I’d be limited to few runs of pipe. I had my heart set on 8 pipes, so the fluid has plenty of time to cool off, so the way to do this was by having hollow end sections cut from aluminum that would channel the fluid as needed to make the circuit.
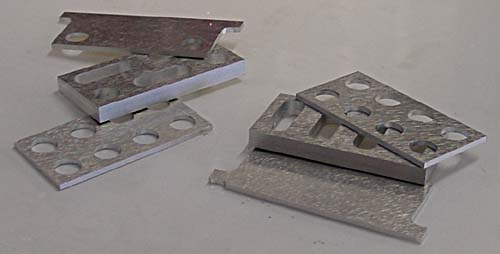
The radiator parts, shortly after being cut.
42 (of course) copper fins were slid down the pipes to pull off the heat and the aluminum ends were assembled and attached to the pipes. Don’t throw stones at me, but it was actually just JB Welded together! It’s good to 500 degrees, and if the XBox gets THAT hot I’ve got other problems!

The parts were routed so accurately that everything fit very tight already and we just needed a waterproofing. During the gluing and hammering smoke was blown through the thing to find any air holes and plug them before it all dried (Remember kids – don’t smoke while making your own custom radiators for Xbox 360 laptops – it’s not good for you)
A scene from “Underworld 3: More Shots of Kate Beckinsale’s Butt?” Nope, just my radiator test, sorry.
I used red food coloring for the 24 hour “leak test” because if it failed I wanted it to gush like a gaping wound! Well, and leave visible marks on the paper. In the background there you can sort of see the Gamecube power supply I’m using to power the pump with 12 volts – when it fires up it consumes something like 3 amps. It then settles down to a still kind of high 1.2, which I hope I can either steal off the Xbox or monitor’s power supply. We’ll see…
Postscript:
As I write this I’m in hour 7 of the test… Mike Adsit helped me hammer together the radiator, even though he insisted it would never work. I told him “Look, it’s cool, all made of copper, just like the Statue of Liberty!” To which he replied “Yeah, and it’ll be surrounded by water too!” Granted, pretty much everyone who saw the thing didn’t think it work would so I hope to hell it does. Then I can laugh maniacally at them.
Dateline: End of June ’06
It’s the eleventh hour, 7th guest, bottom of the 9th. Running out of time as usual, I’ve got half a day to attach and test the water-cooling on the Xbox 360.
What lies beneath.
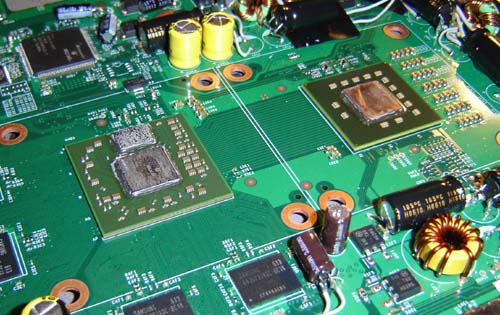
Late the night before I ripped off the original heat sinks. (This was my last chance to find the fabled “chip smashers” and lo and behold they weren’t there – maybe Santa Claus stole them with help from Bigfoot) Above you can see the GPU (left) and CPU (opposite of left) exposed. They had a thick covering of heat sink paste which I spent a good hour removing with rubbing alcohol. Once I had them to a mirror finish I rubbed on Arctic Silver heat transfer compound and attached the Koolance water blocks.
It’s alive…. ALIVE!!!!
With a mere 45 minutes left before I had to leave for a trip the Xbox was water-cooled. Granted these aren’t the final tubing lengths and setups, but I had to see if it at least worked. I tested it for about 30 minutes, which is certainly long enough to bring the ‘Box to a full boil. The radiator indeed got hot, although I was only using the stock Xbox fans to cool it. (Note there is no reservoir yet) As you can see I also attached some small heat sinks (that were included with water blocks) to the RAM.
Radiator Postscript:
After getting back from my trip I was able to test the Xbox longer. The radiator gets quite warm, but not as warm as say the original GPU heat sink which got so hot you wonder “is this OK?” and “maybe I could set my coffee here!” Still, in the final unit it will be bolted to the bottom of the aluminum case, draining some heat, and will also have a cover so the fans blow directly across the fins. On the flip side of that coin and enclosed case will trap more heat, so the fans will have their work cut out for them.
Dateline: Early July – 2006
Supplies Remaining:
30 cans Diet Pepsi
697 bullets
.8 pounds turkey
Zero axles
The design is coming into its final stages. I have also decided to build a small reservoir to increase the total amount of water in the system. Granted there’s not much free space left, but I believe I can add a tank that will increase the total amount of water in the system by 33%. This will also allow me to put in a easy “top off port” so the water level can be maintained if need be. (much like a car)
The main internal layout, with a rendered front view and a bit of the reservoir on the left.
Above you can see my layout for the main guts of the unit (the bottom half of the case) Things are a bit tight in places, not so bad in others, but it should all work out in the end. There’s not much left to do now but finalize the case design and get the drawings ready to be cut. This is probably my most “hybrid” case ever as it will use carbide bit routed aluminum and laser cut plastic parts. Then of course there’s the troubleshoot, but, bleh, let’s get the case done first.
Dateline: Early July, 2006
Now it’s time for the real meat and potatoes of the project – a case. We all know that’s what makes it really special. For this device, I decided to make my first all-aluminum casing, both to sink heat and to support the weight of the water, DVD drives and large screen. I created the case by routing parts out of .080″ aluminum and having it welded together, as shown below:
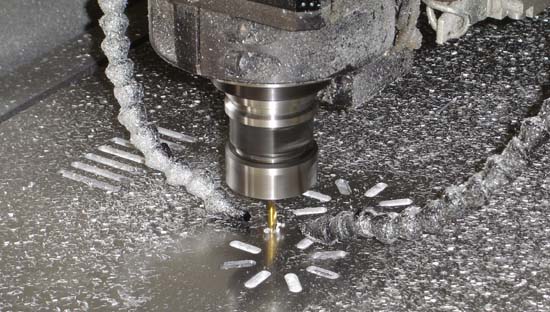
The Sabre 408 routing the first parts of the case. Yes, it is quite the mess.

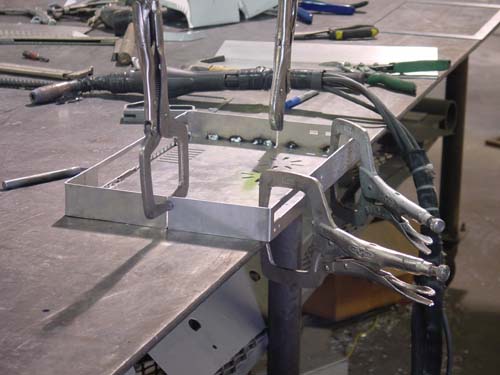
First piece attached, ready for bending.
The lower portion of the case takes shape.
The assembled case pieces laid atop each other.
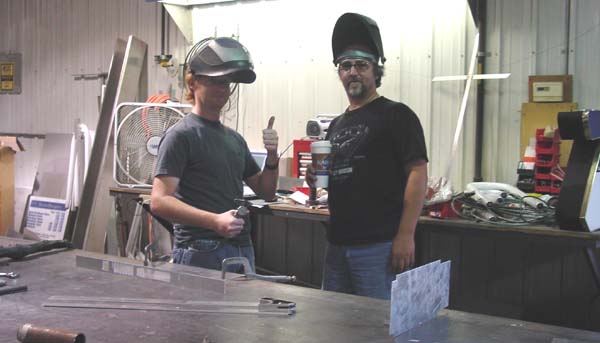
The guilty parties. Myself on the left, Kevin Rott, ace welder (and coffee lover) on the right.
All this aluminum work was done at Jim Greeley Signs and Awnings, so if you’re in the Wisconsin area of the Midwest and need some hi-tech signage or something, why not look them up? Tell ’em Ben sent ya!
After the case was assembled I then painted it with several layers of enamel and let it dry a good solid week before doing anything else.
Dateline: Mid July – 2006
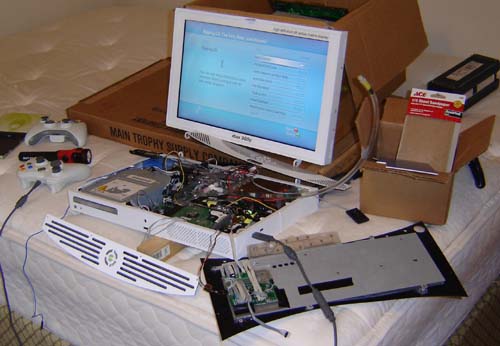
Troubleshooting. And then more troubleshooting. After that, yes, troubleshooting. With the case finished I have been able to install components and try out the system.
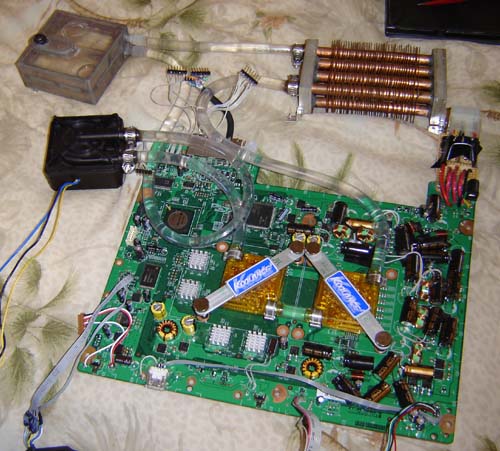
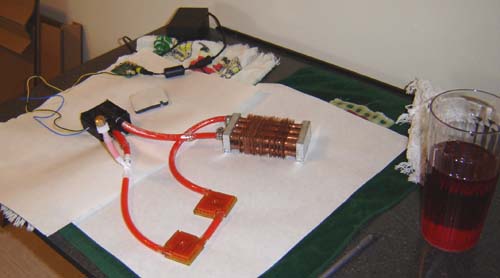
Above you can see the basic watercooling circuit of the system. It involves the pump, motherboard, radiator and reservoir.
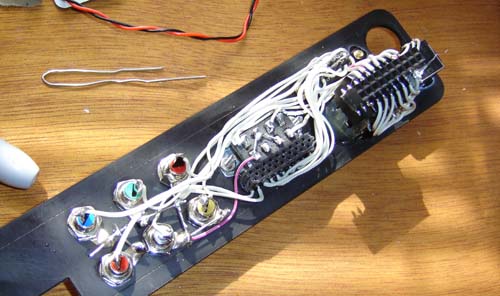
This is the wiring on the rear breakout AV panel. Plugs from the Xbox 360 motherboard insert into these headers, along with plugs from the monitor. It’s kind of the Grand Central Station of video/audio signals in the unit.
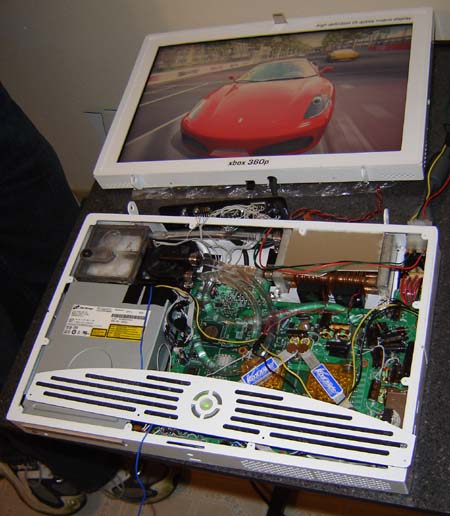
This is the first photo of the unit in the casing and running. However, I kept finding bugs (mostly with the water-cooling but also with other things) so the last few days have been a vicious cycle of:
1)test system
2)find problem
3) tear it all apart
4) fix problem
5) put it back together
6) find new problem.
7) get discouraged and drink beer
8) go at it again
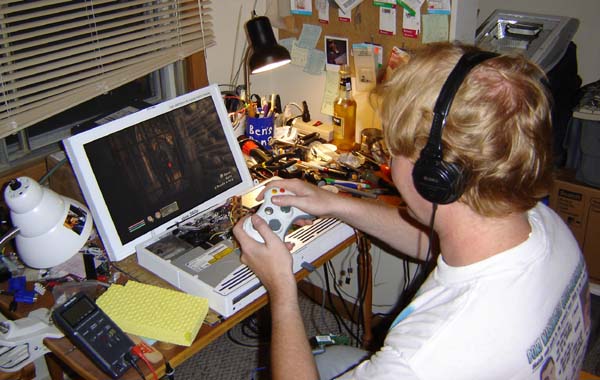
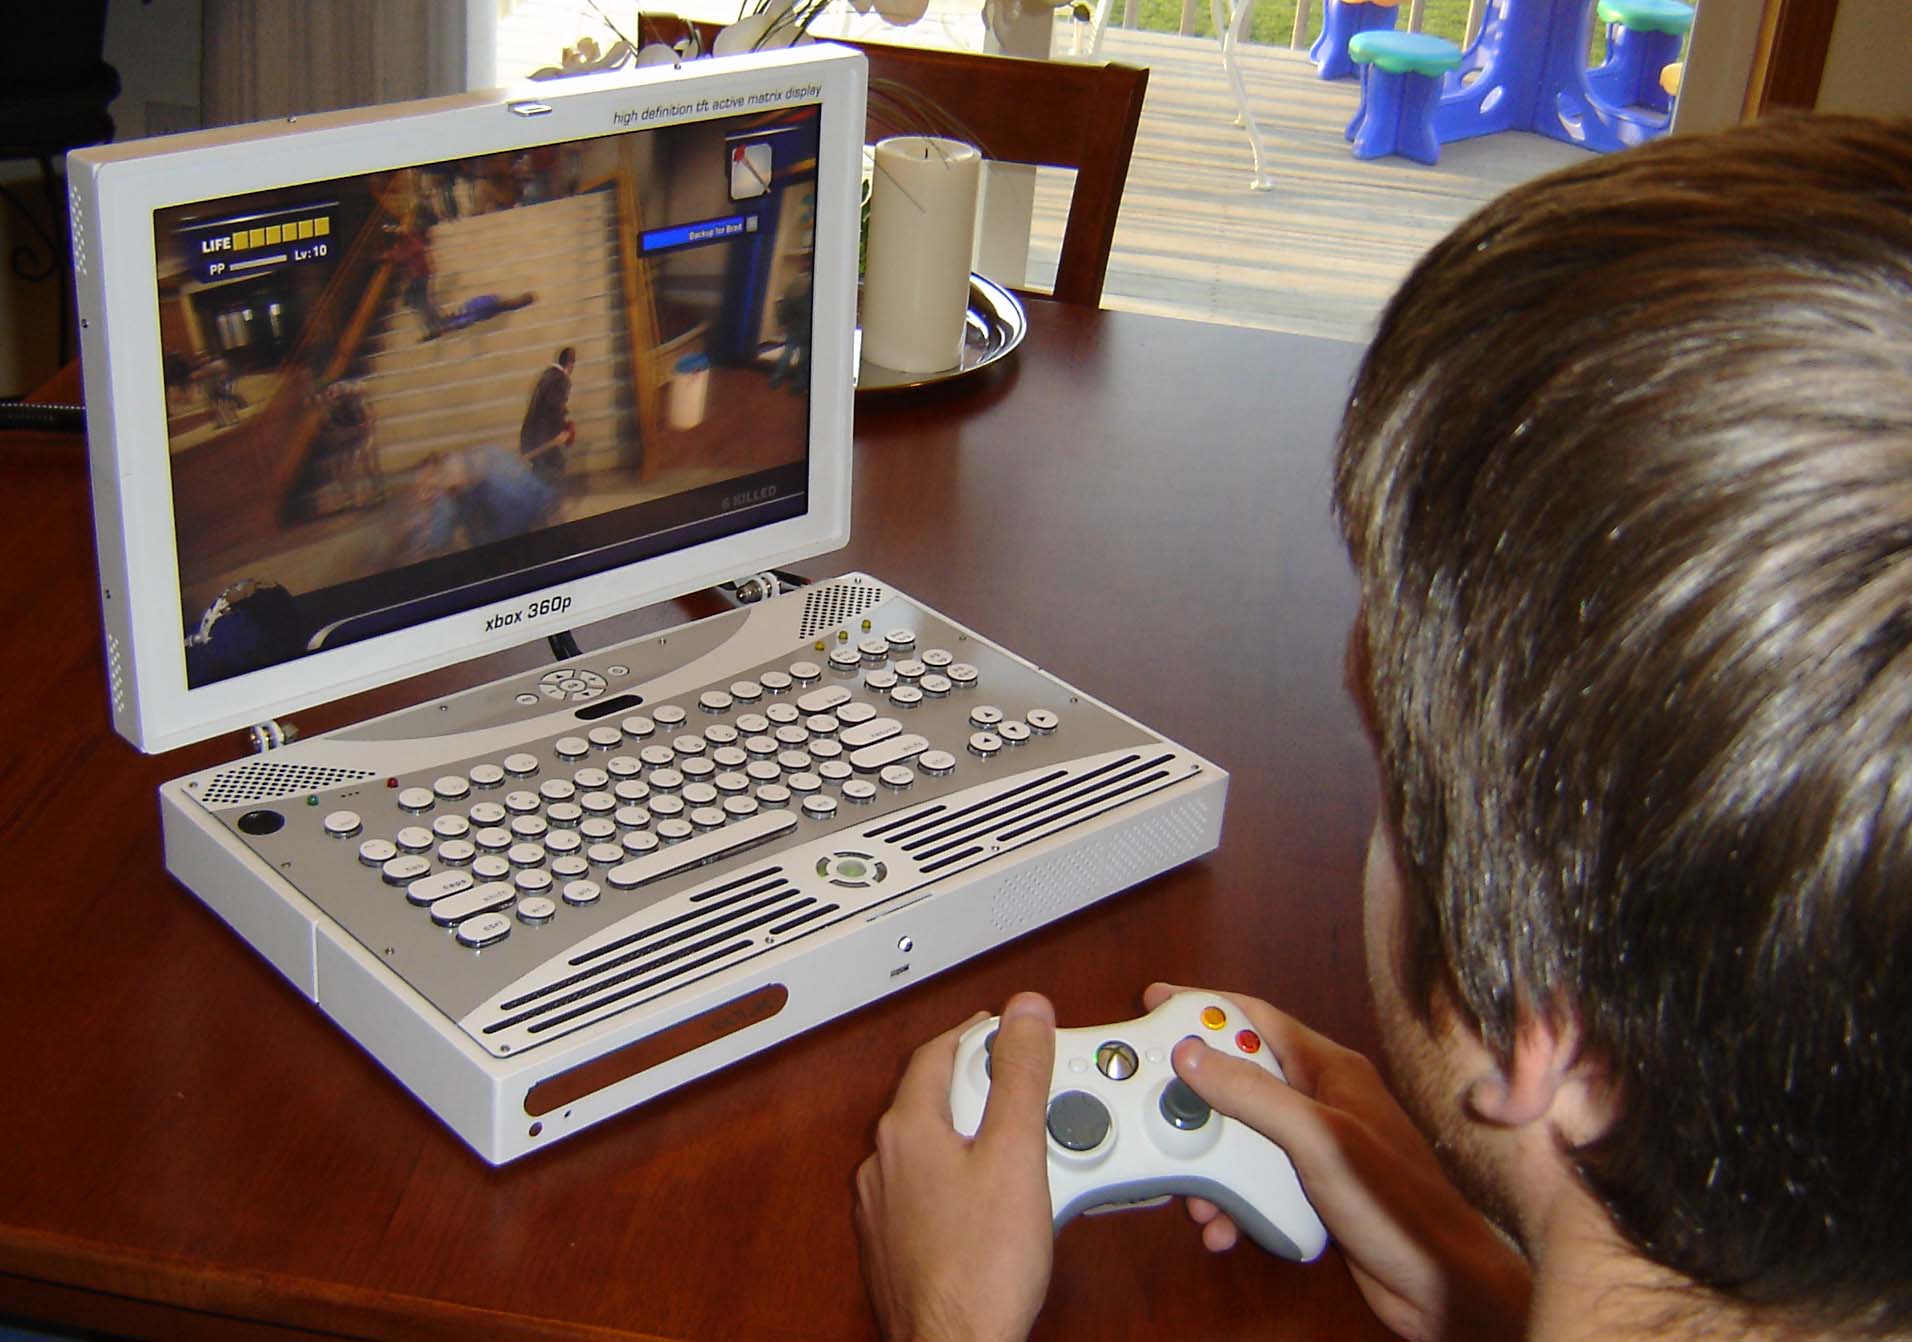
Here I am late the night of August 4th, playing Oblivion on the system. No speakers yet, just headphones (they plug into the right side of the monitor) The goal here is to play until a problem crops up – note the sponge at the ready. Bits of sponge are also packed inside the system in case of mishap. I start saying to myself – “Oh water-cooling, what a BRILLIANT idea Ben!”
Ah, game testing always goes better with a delicious hunk of fresh, uncooked Rat Meat. I have to say, playing the games in high-definition is a marked improvement over regular TV’s. The menus are shaper, edges are cleaner and well, it just plain looks better. Plus the widescreen is cool too.
We’ll fast-forward now to the end of August. Testing continues, profanities fly and the reservoir goes through 5, yes, FIVE revisions before I finally build one the way I should have all along. In the end I use a piece of square aluminum tubing with top and bottom caps and threaded-in hose barbs. A month of my life, gone forever. Sigh. At least next time I know what NOT to do.
Xbox being tested on laundry day. You can see the Ring of light portion, keyboard and, well, everything else hanging off it.
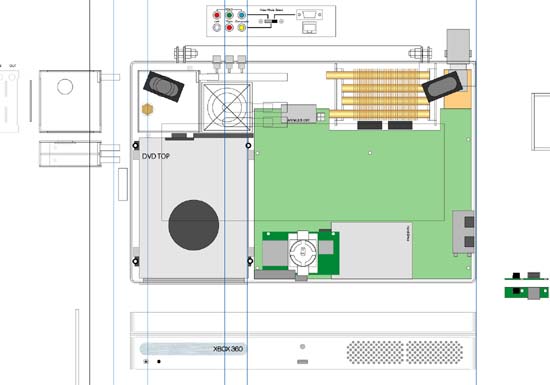
The inside of the Xbox 360 laptop case, with labels:
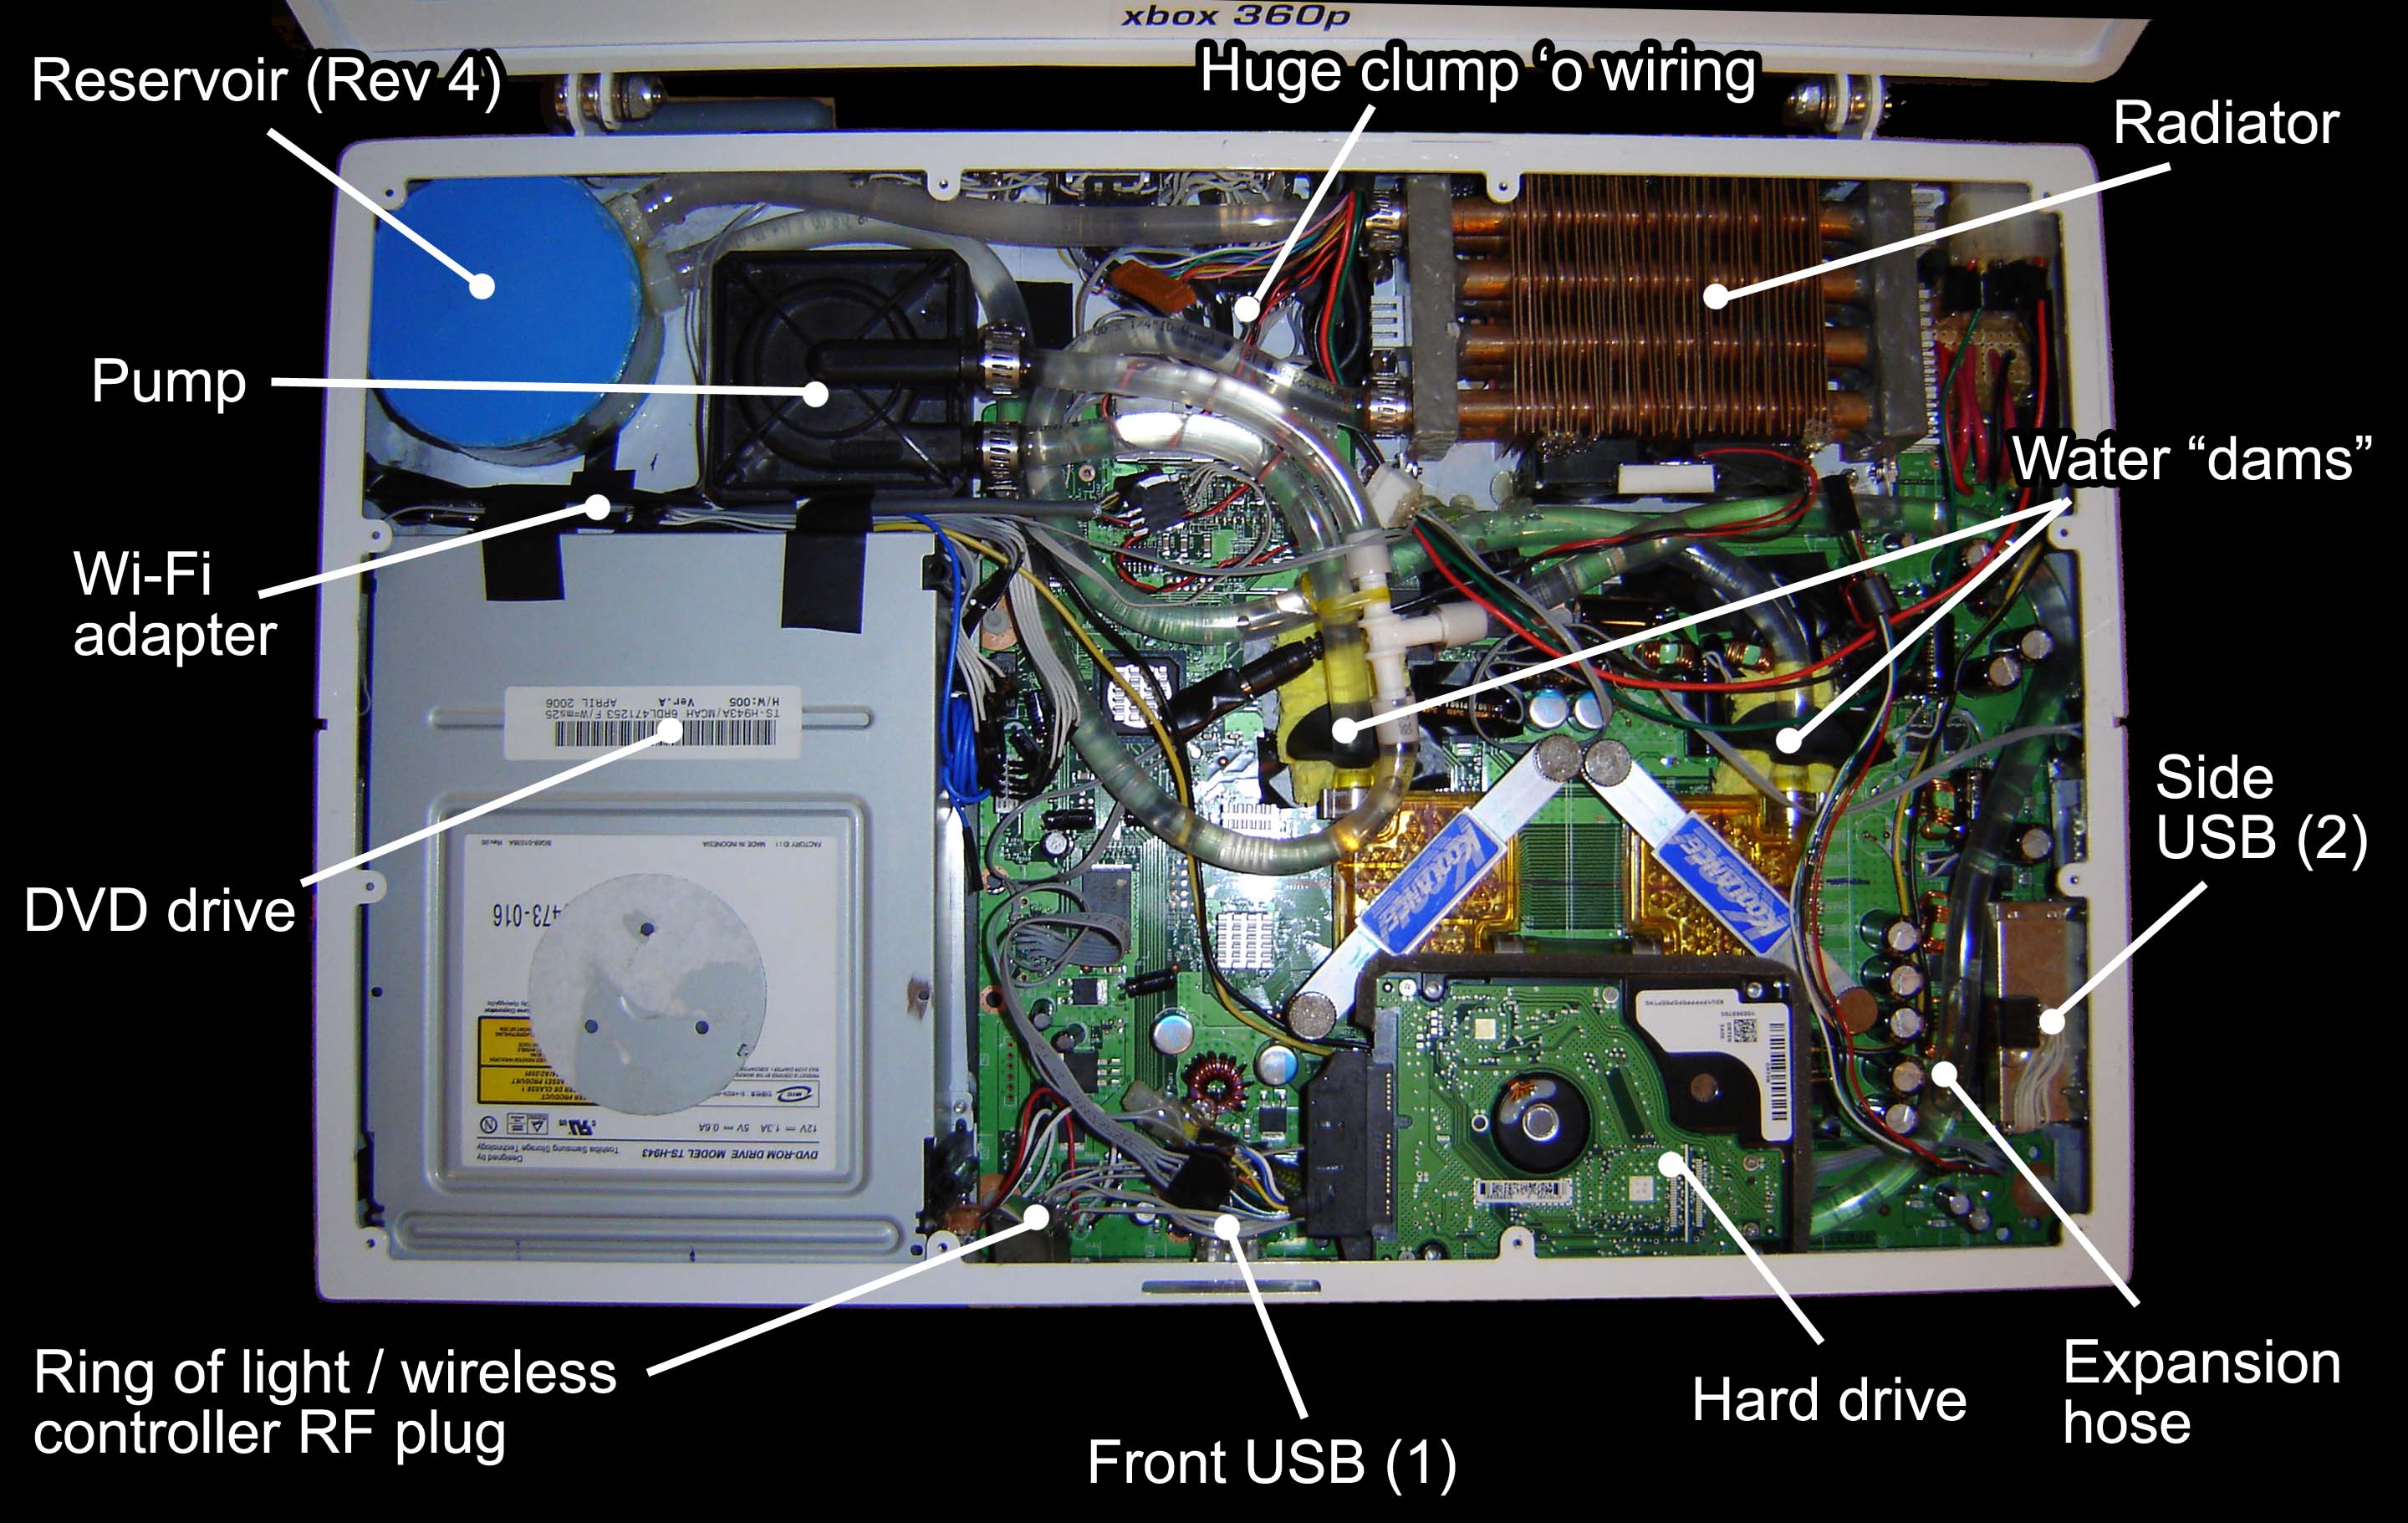
Click image for larger version

A different angle of the “guts view” You can see the side USB ports here.
With the troubleshooting out of the way it’s time to install the final components and finish up the unit! It’s about f**king time, I say!
Dateline: Early September, 2006
With all the troubleshooting done I could finally assemble the last bits of the unit, seal it up and complete it. FINALLY. This mostly involved installing the front plates such as the keyboard, ring of light and screen controls. Here are several photos of the completed unit:
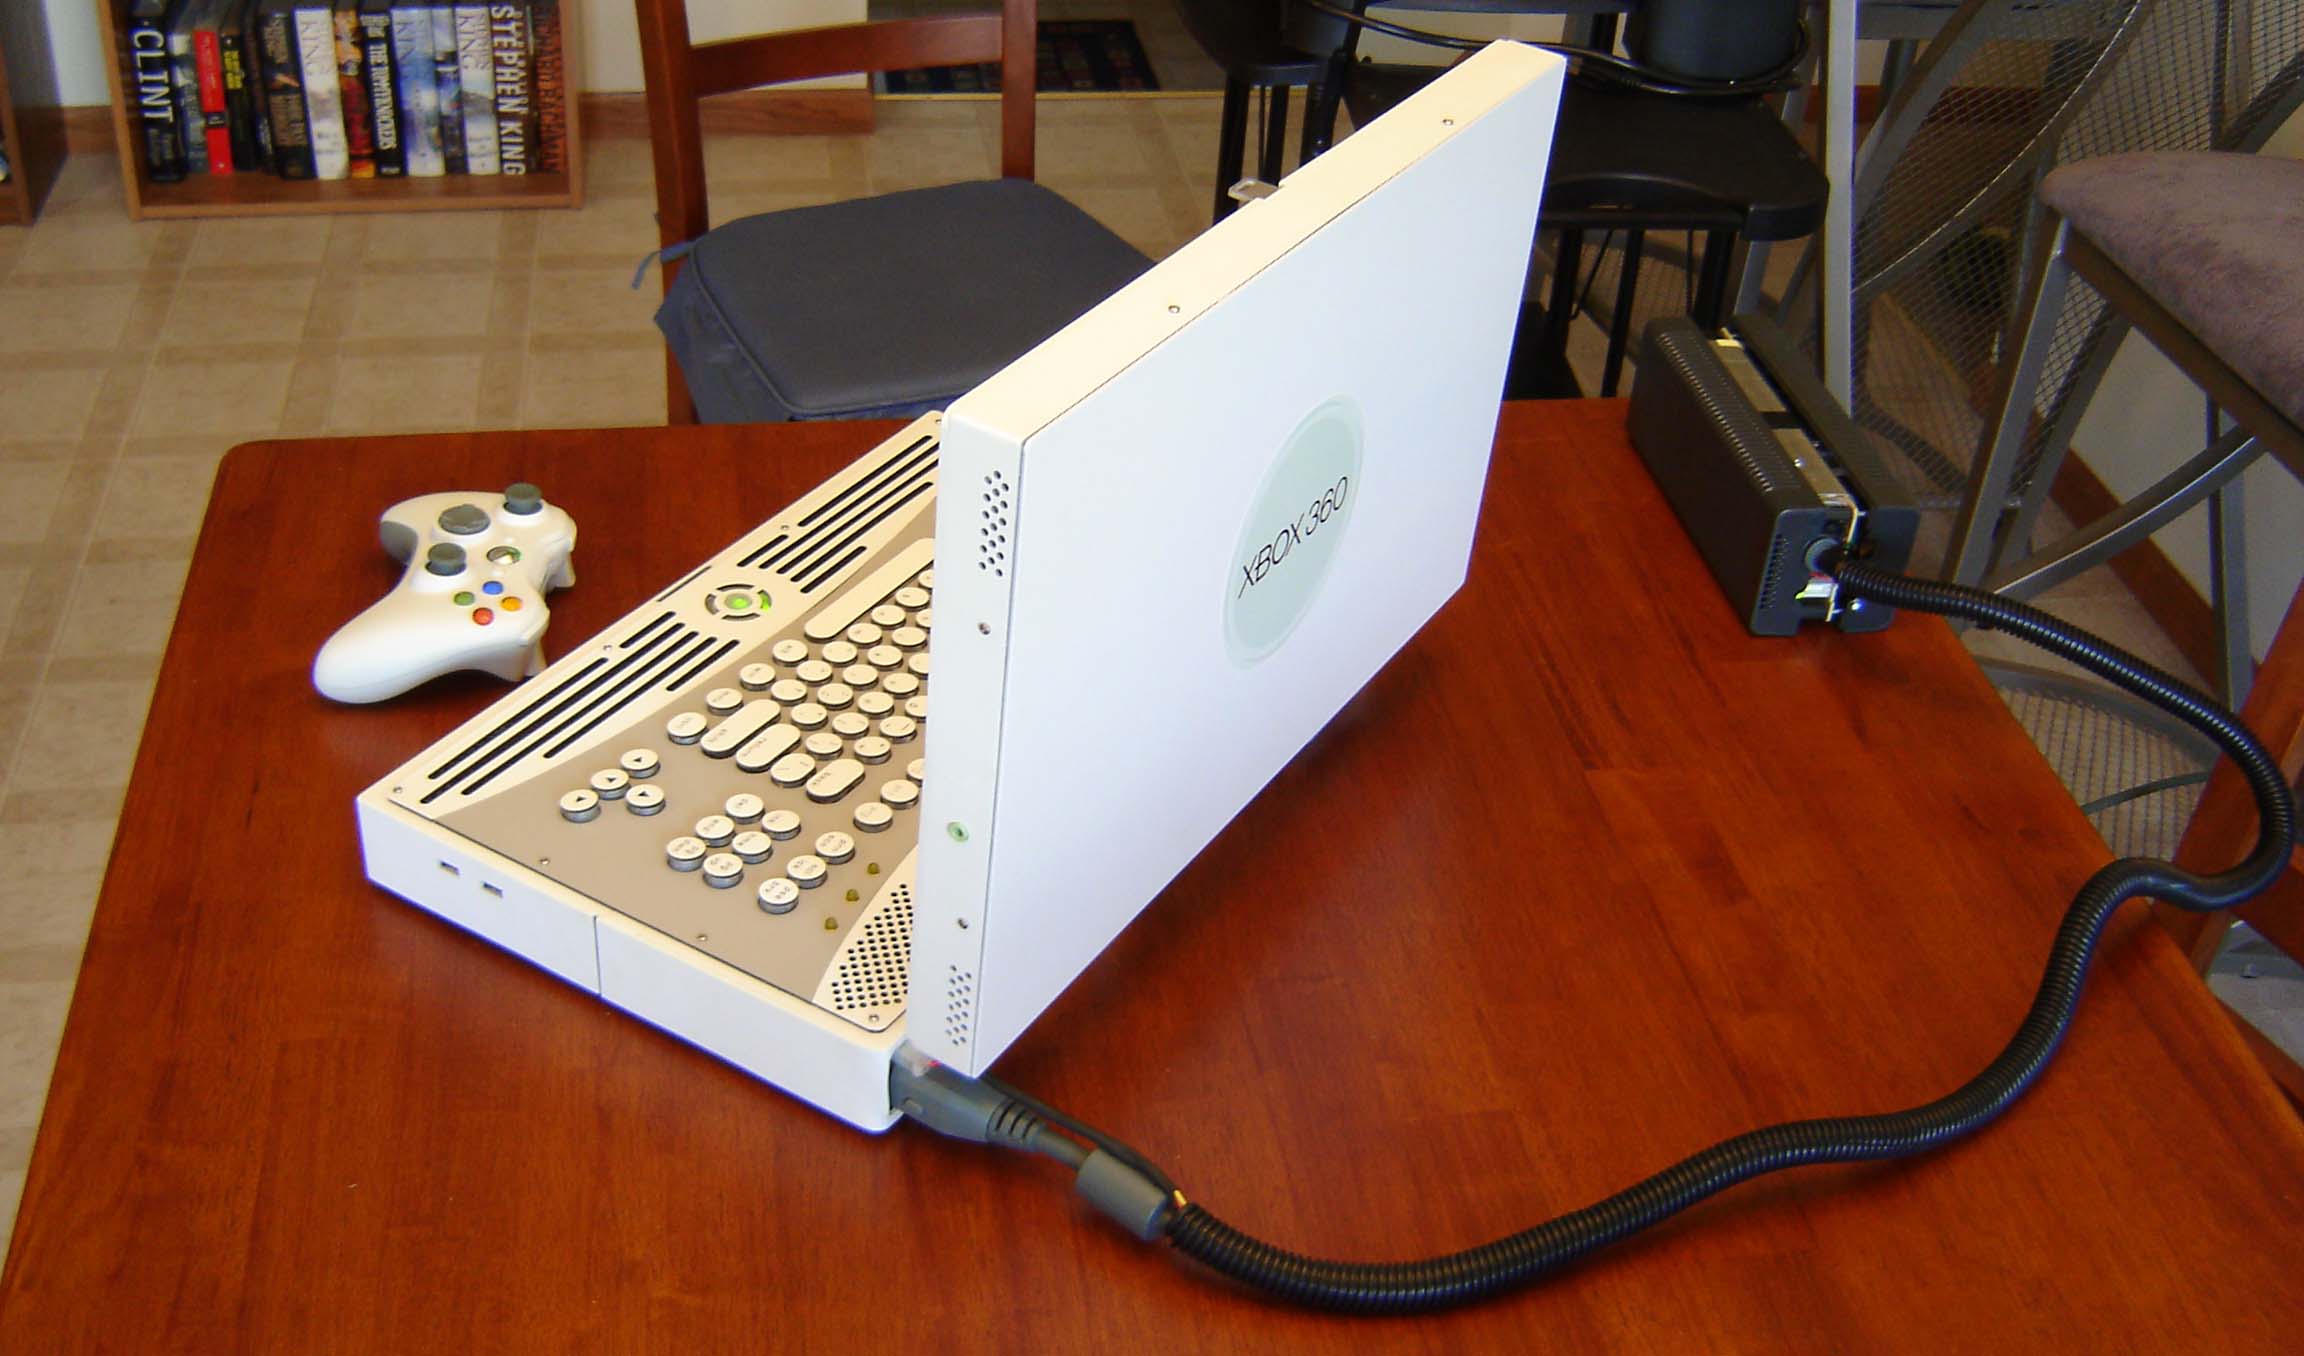
Photo behind the 360 laptop, with super power plug.
Click image for larger version.
The finished unit, loaded with distilled water, weighs about 14 lbs, according to my bathroom scale. Of course, I’m not always inclined to believe THAT thing 😉
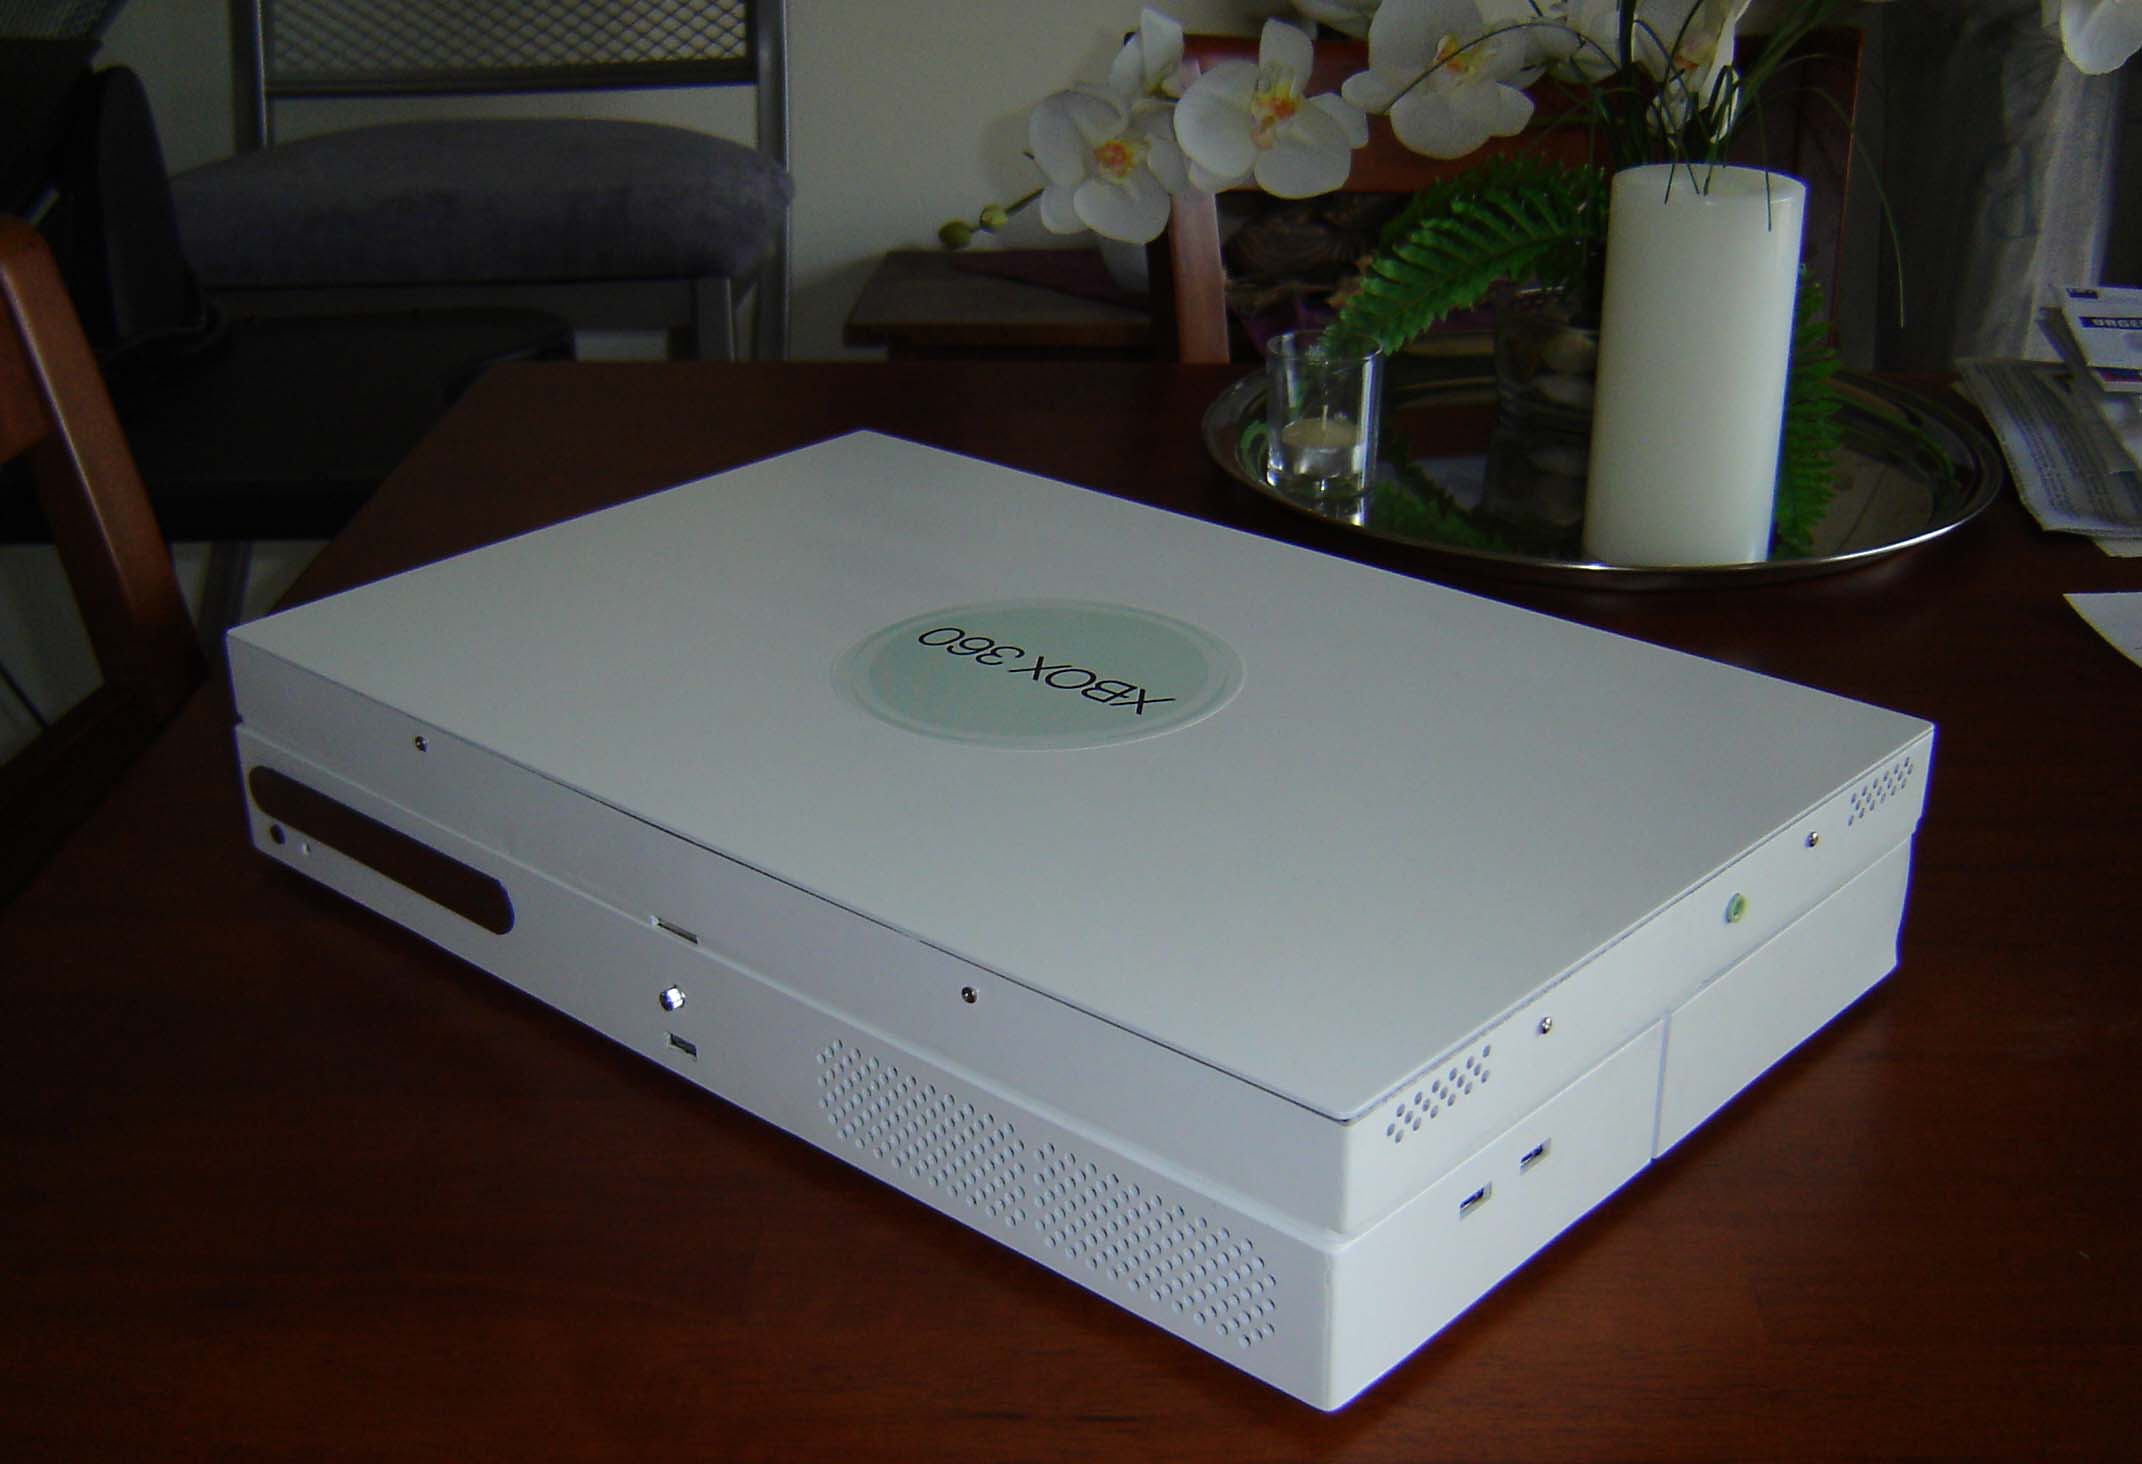
Xbox 360 laptop, closed, on table.
Click image for larger version.
The total thickness of the final unit is 2.8 inches. My goal was for it to be under 3, so I’m happy.
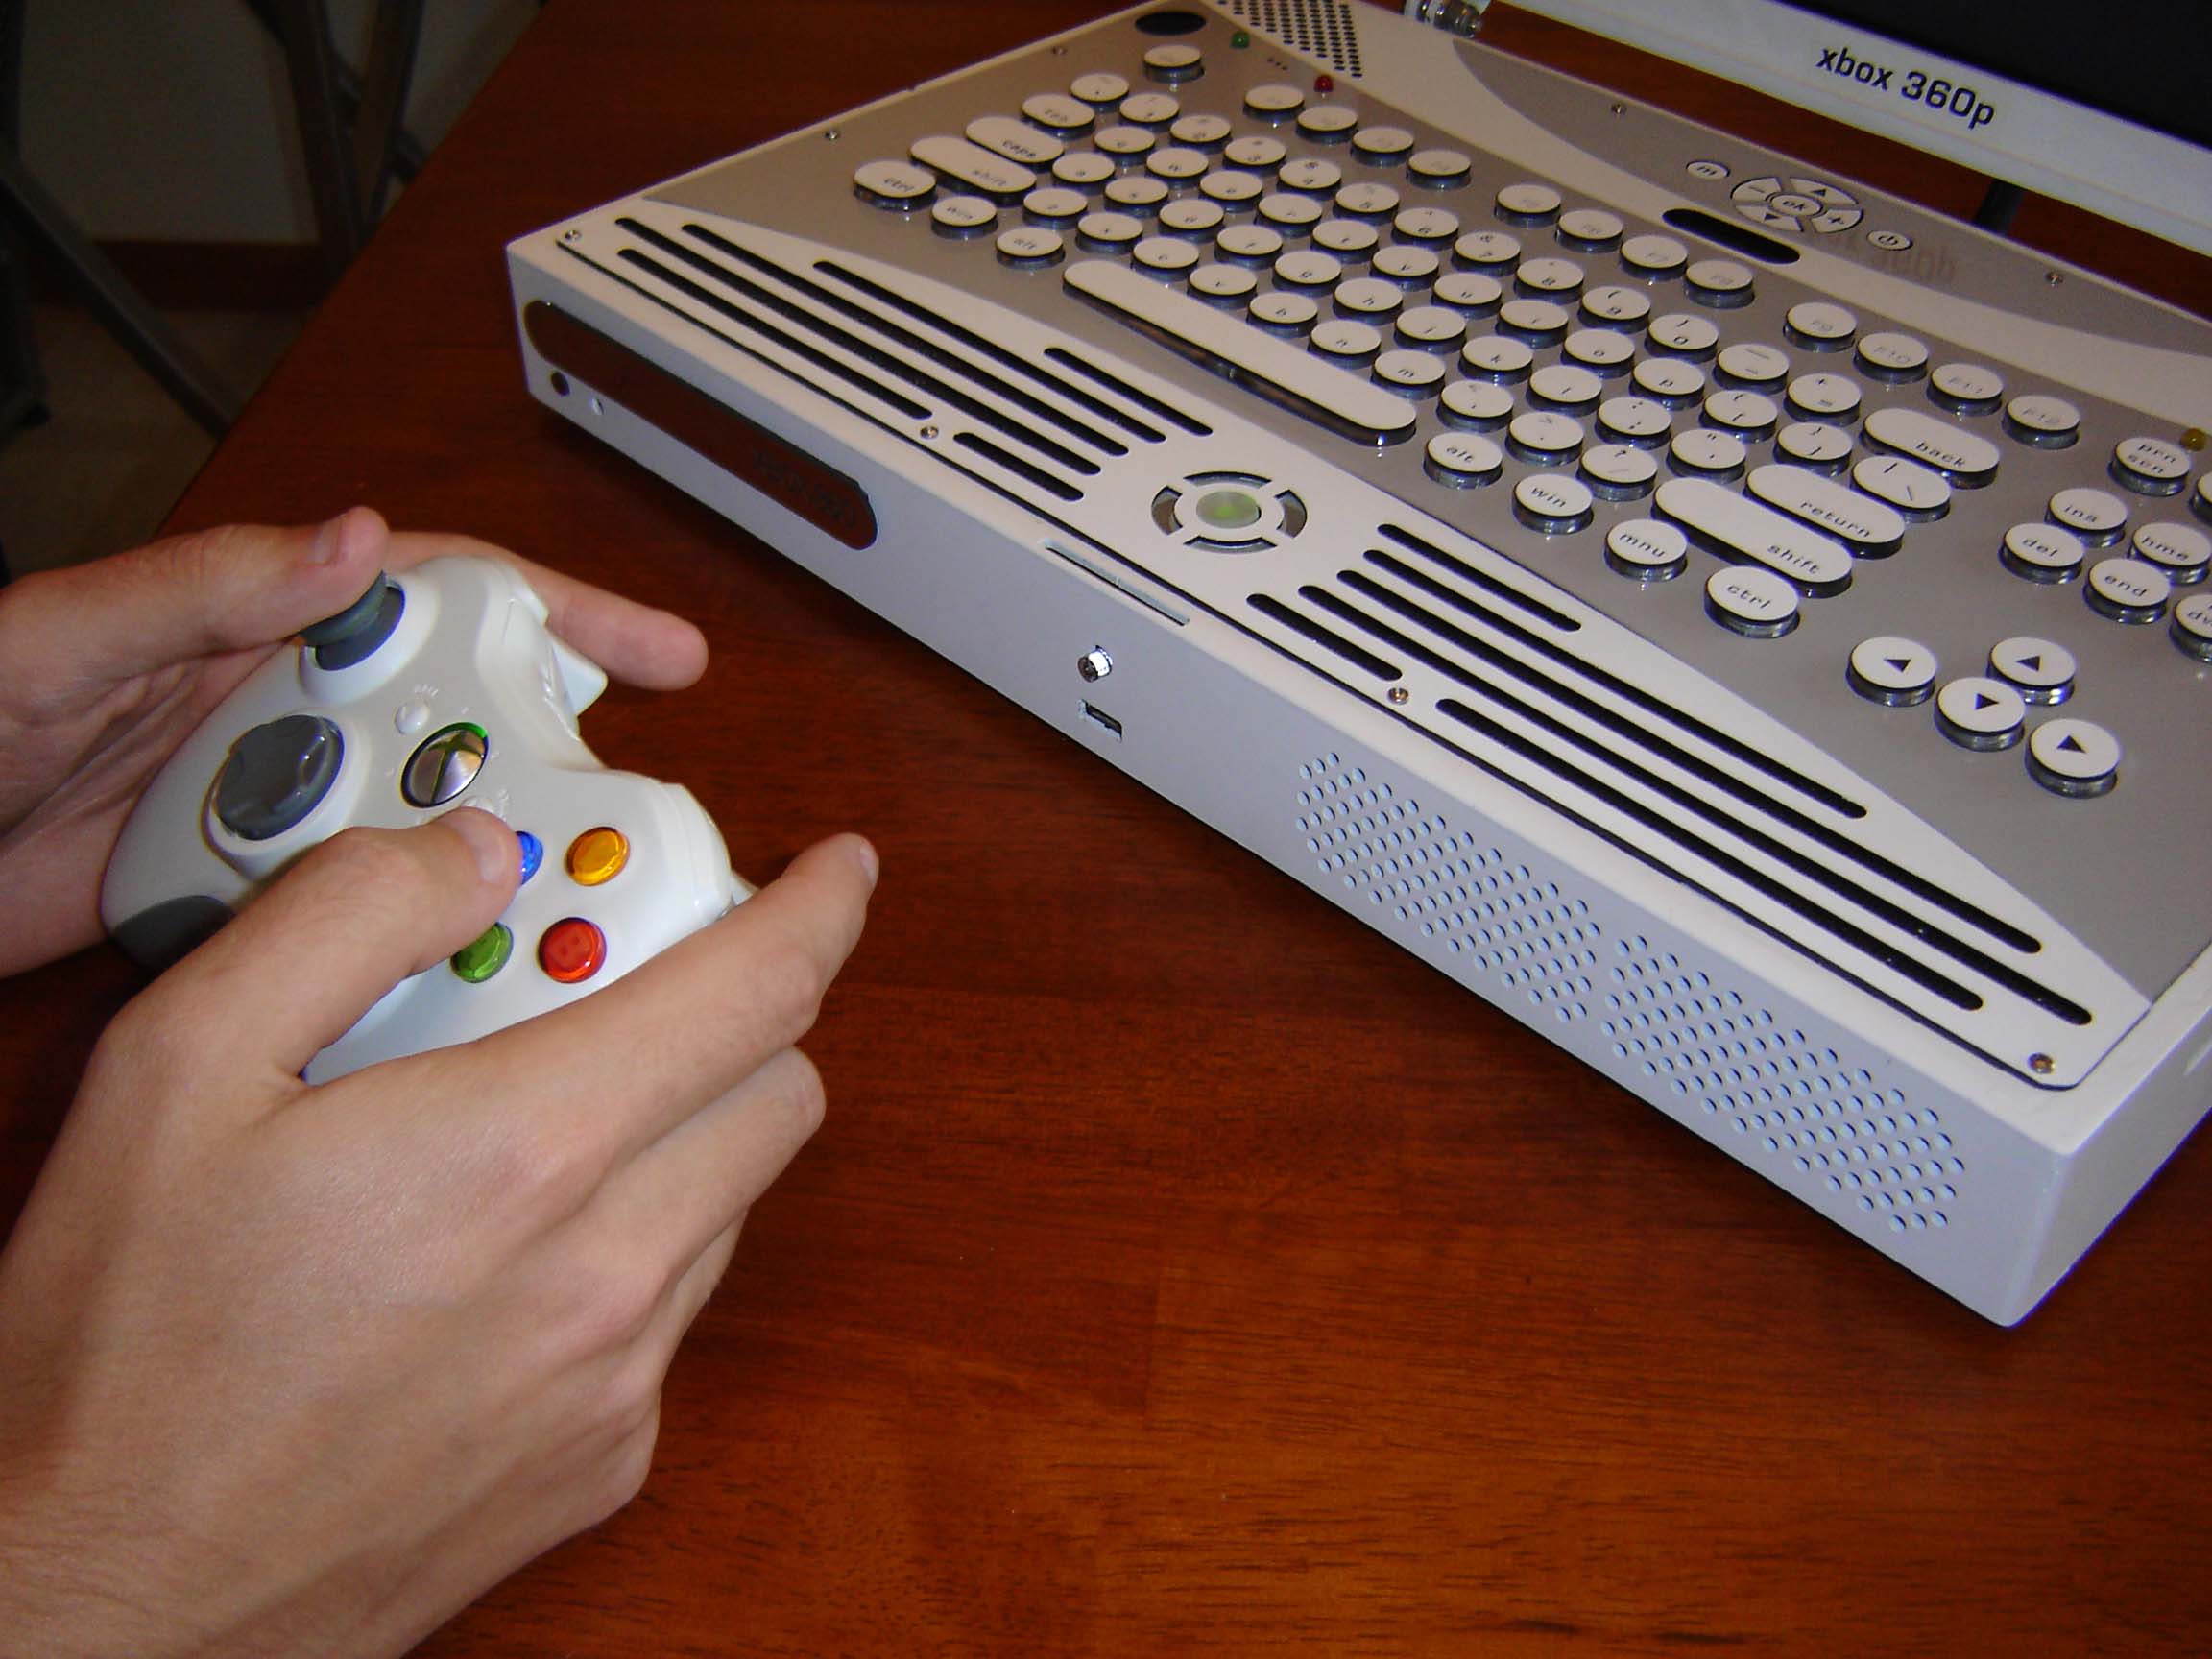
Front detail, with controller.
Click image for larger version.
Here you can see the eject button for the lid (front, near the Ring of Light) and front exhaust holes which have their own fan. Inside one of the holes is the “Bind” button for the controllers.
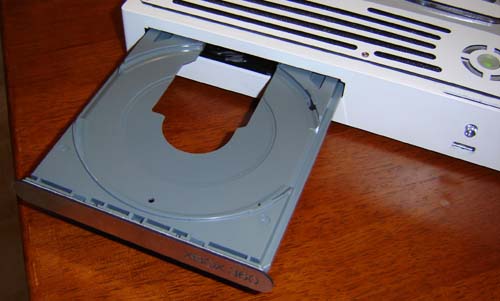
The DVD tray, in “eject position” Note the lid open button and front USB port on the right. Noted? Great.
The DVD tray BARELY fit through the hole I had cut, even after I hand-Dremeled an extra bit of room at the top. Oh well, I’ll take barely fits over DOESN’T fit any day!
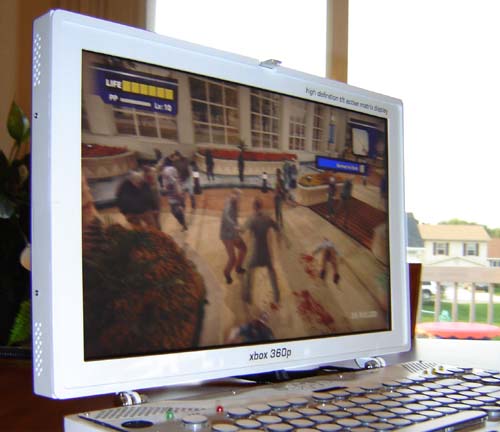
Jason Jones, Xbox fiend, embarking on a Dead Rising zombie killing spree. He’s thrilled that he can read the text now.
Click image for larger version.
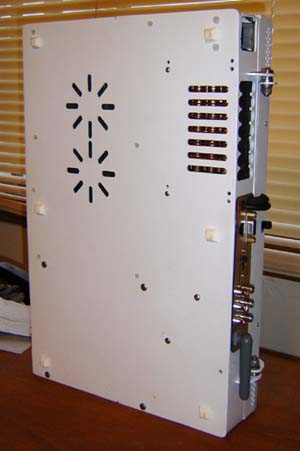
The bottom of the Xbox 360 Laptop

Jones continues his quest to become “The Next Top Gaming Model”
Click image for larger version.
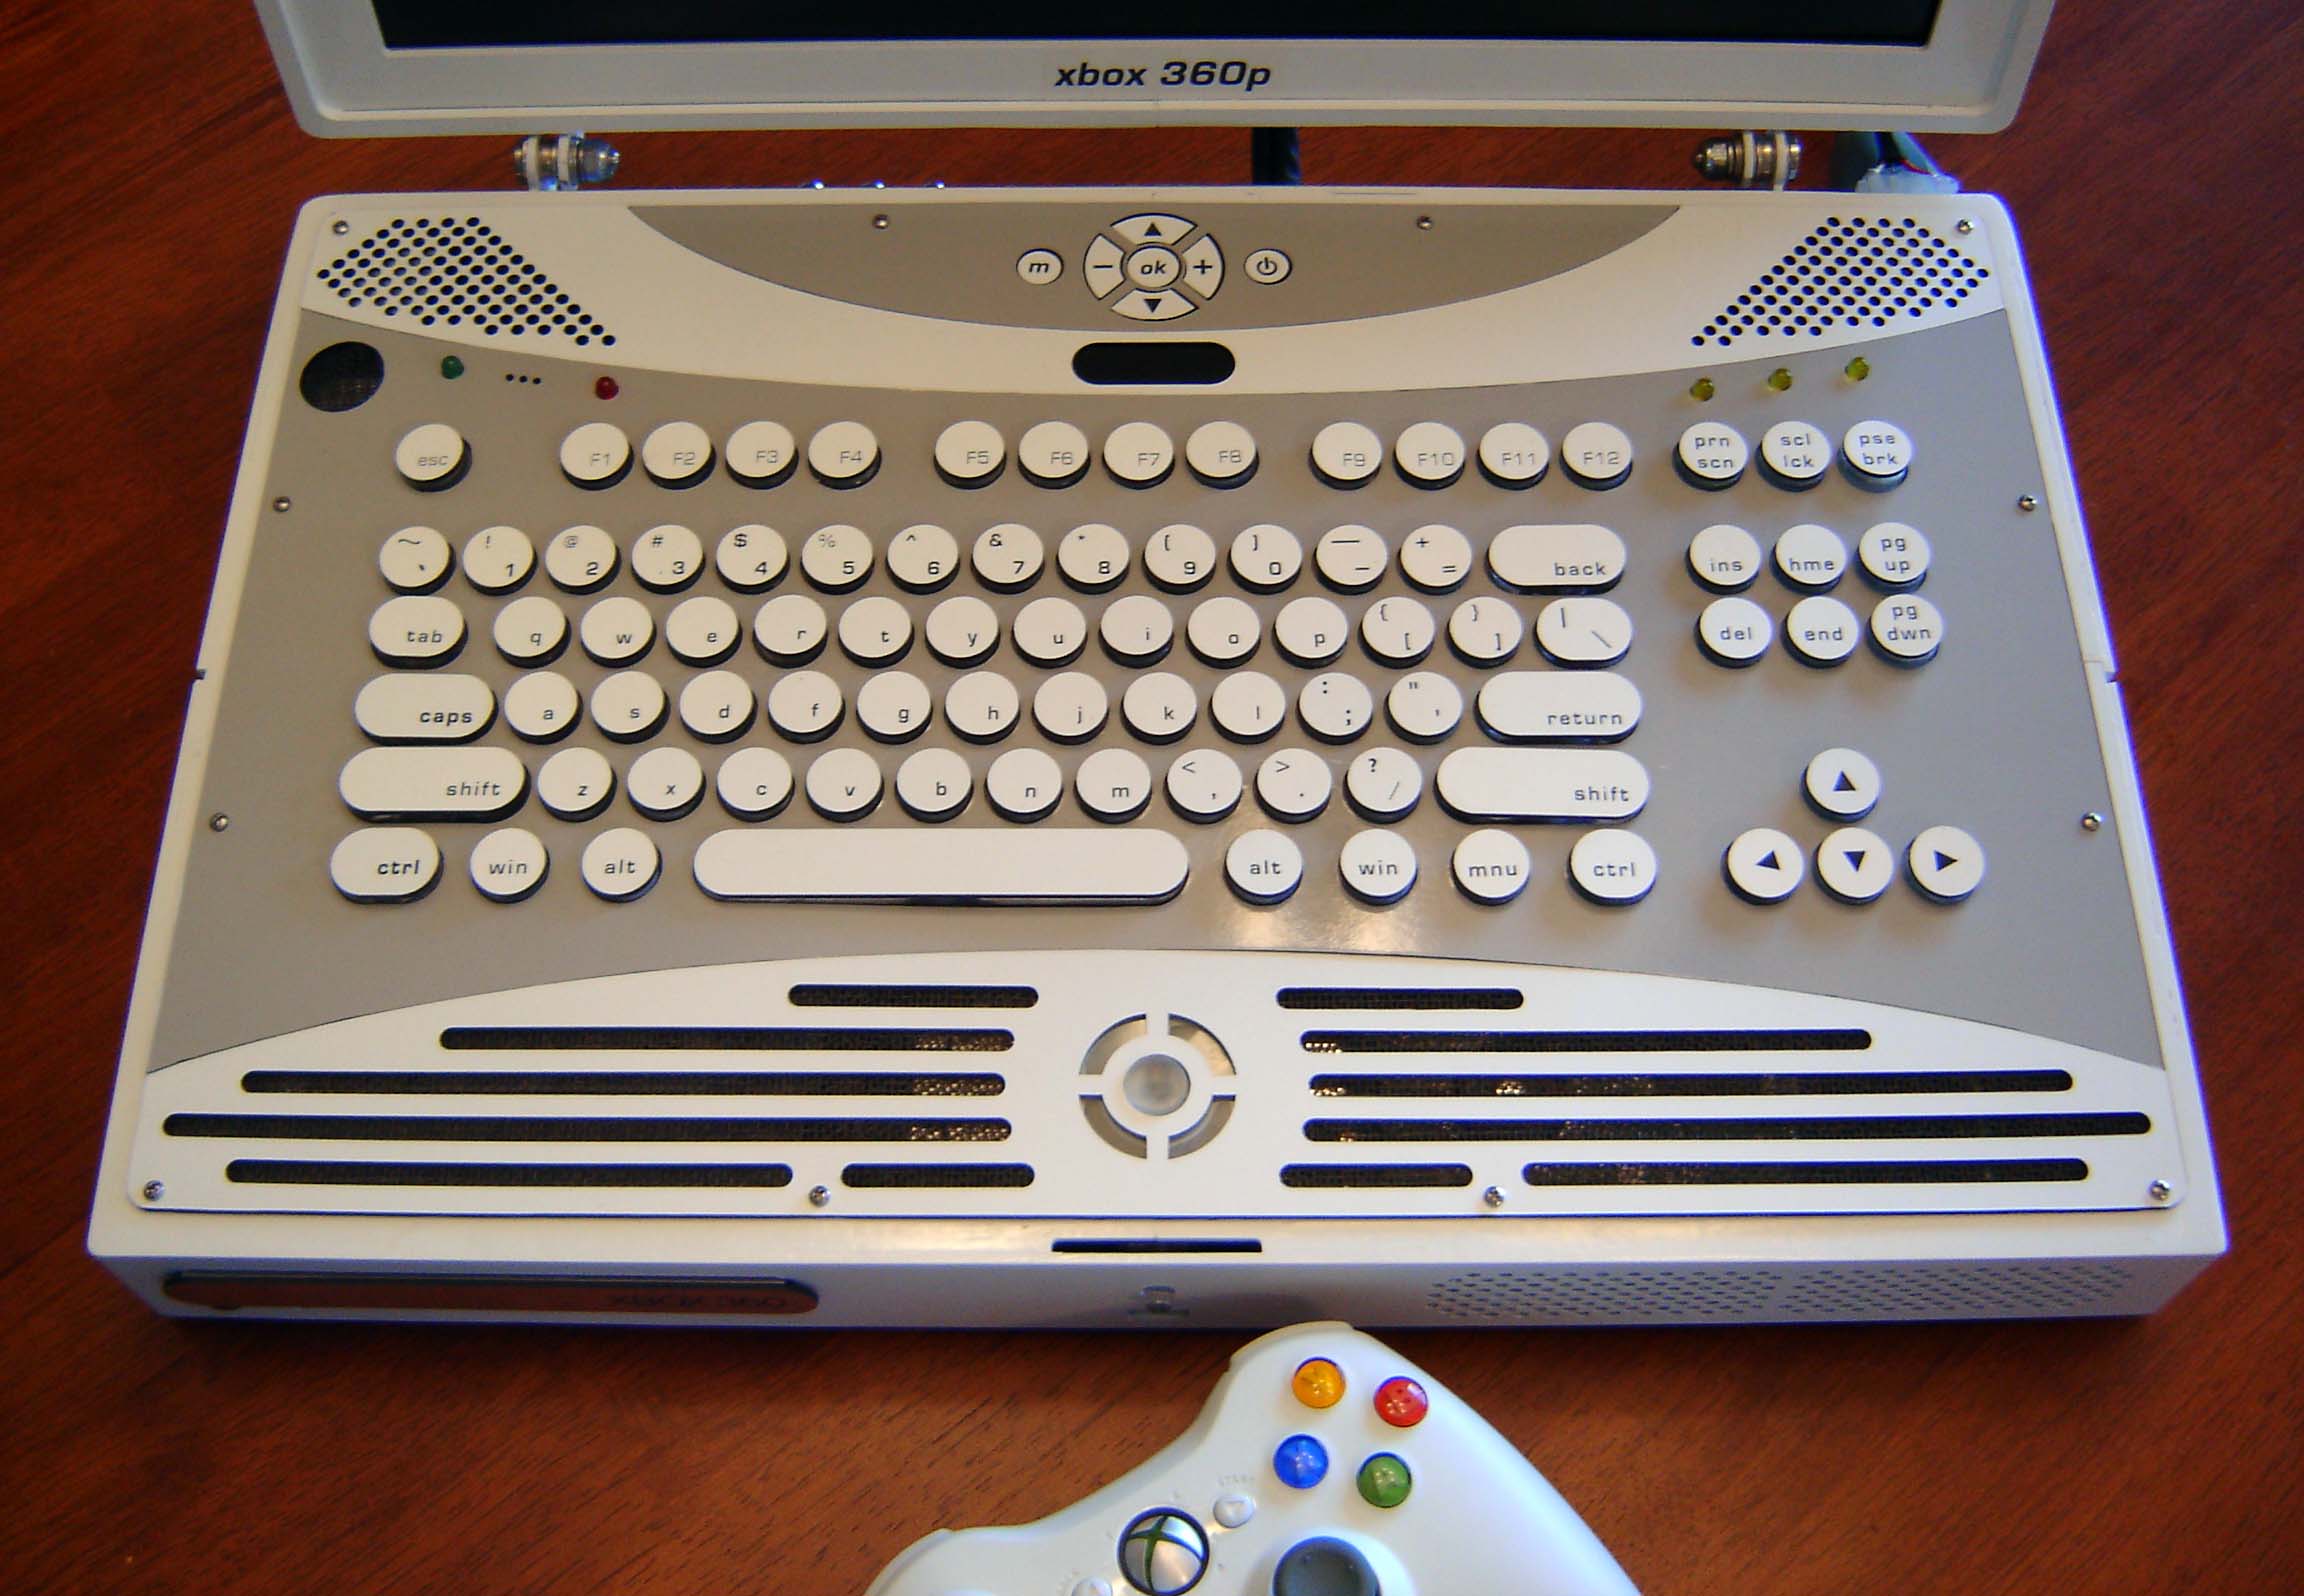
Top-down detail of keyboard and control area. The keys were cut using a laser engraver and attached to the original keyboard’s silicon dome buttons. Thus, the spacing remains the same, sans number pad.
Click image for larger version.
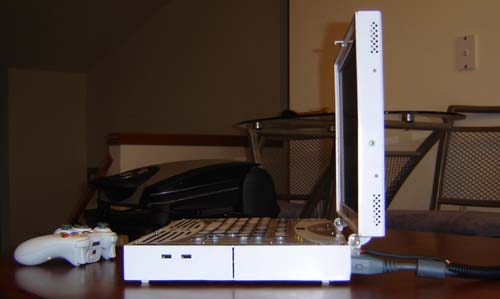
Profile of the XBox 360 laptop.

Jones gives his review of the device. Strangely, it’s the same thing he says about everything he likes.
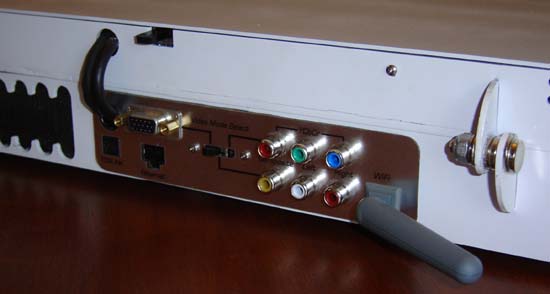
Rear ports, including component, VGA, TOSLink and the Wi-Fi antenna. Separate cables not sold separately.
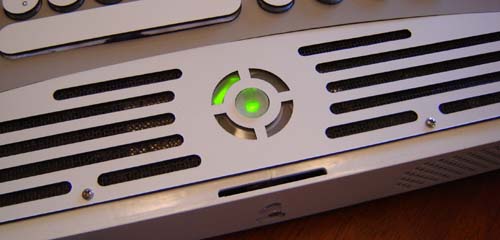
The beloved “ring of light”, blinking happily for all Xbox lovers to see.
Closer view of screen, with white picket fence suburbia in the background.
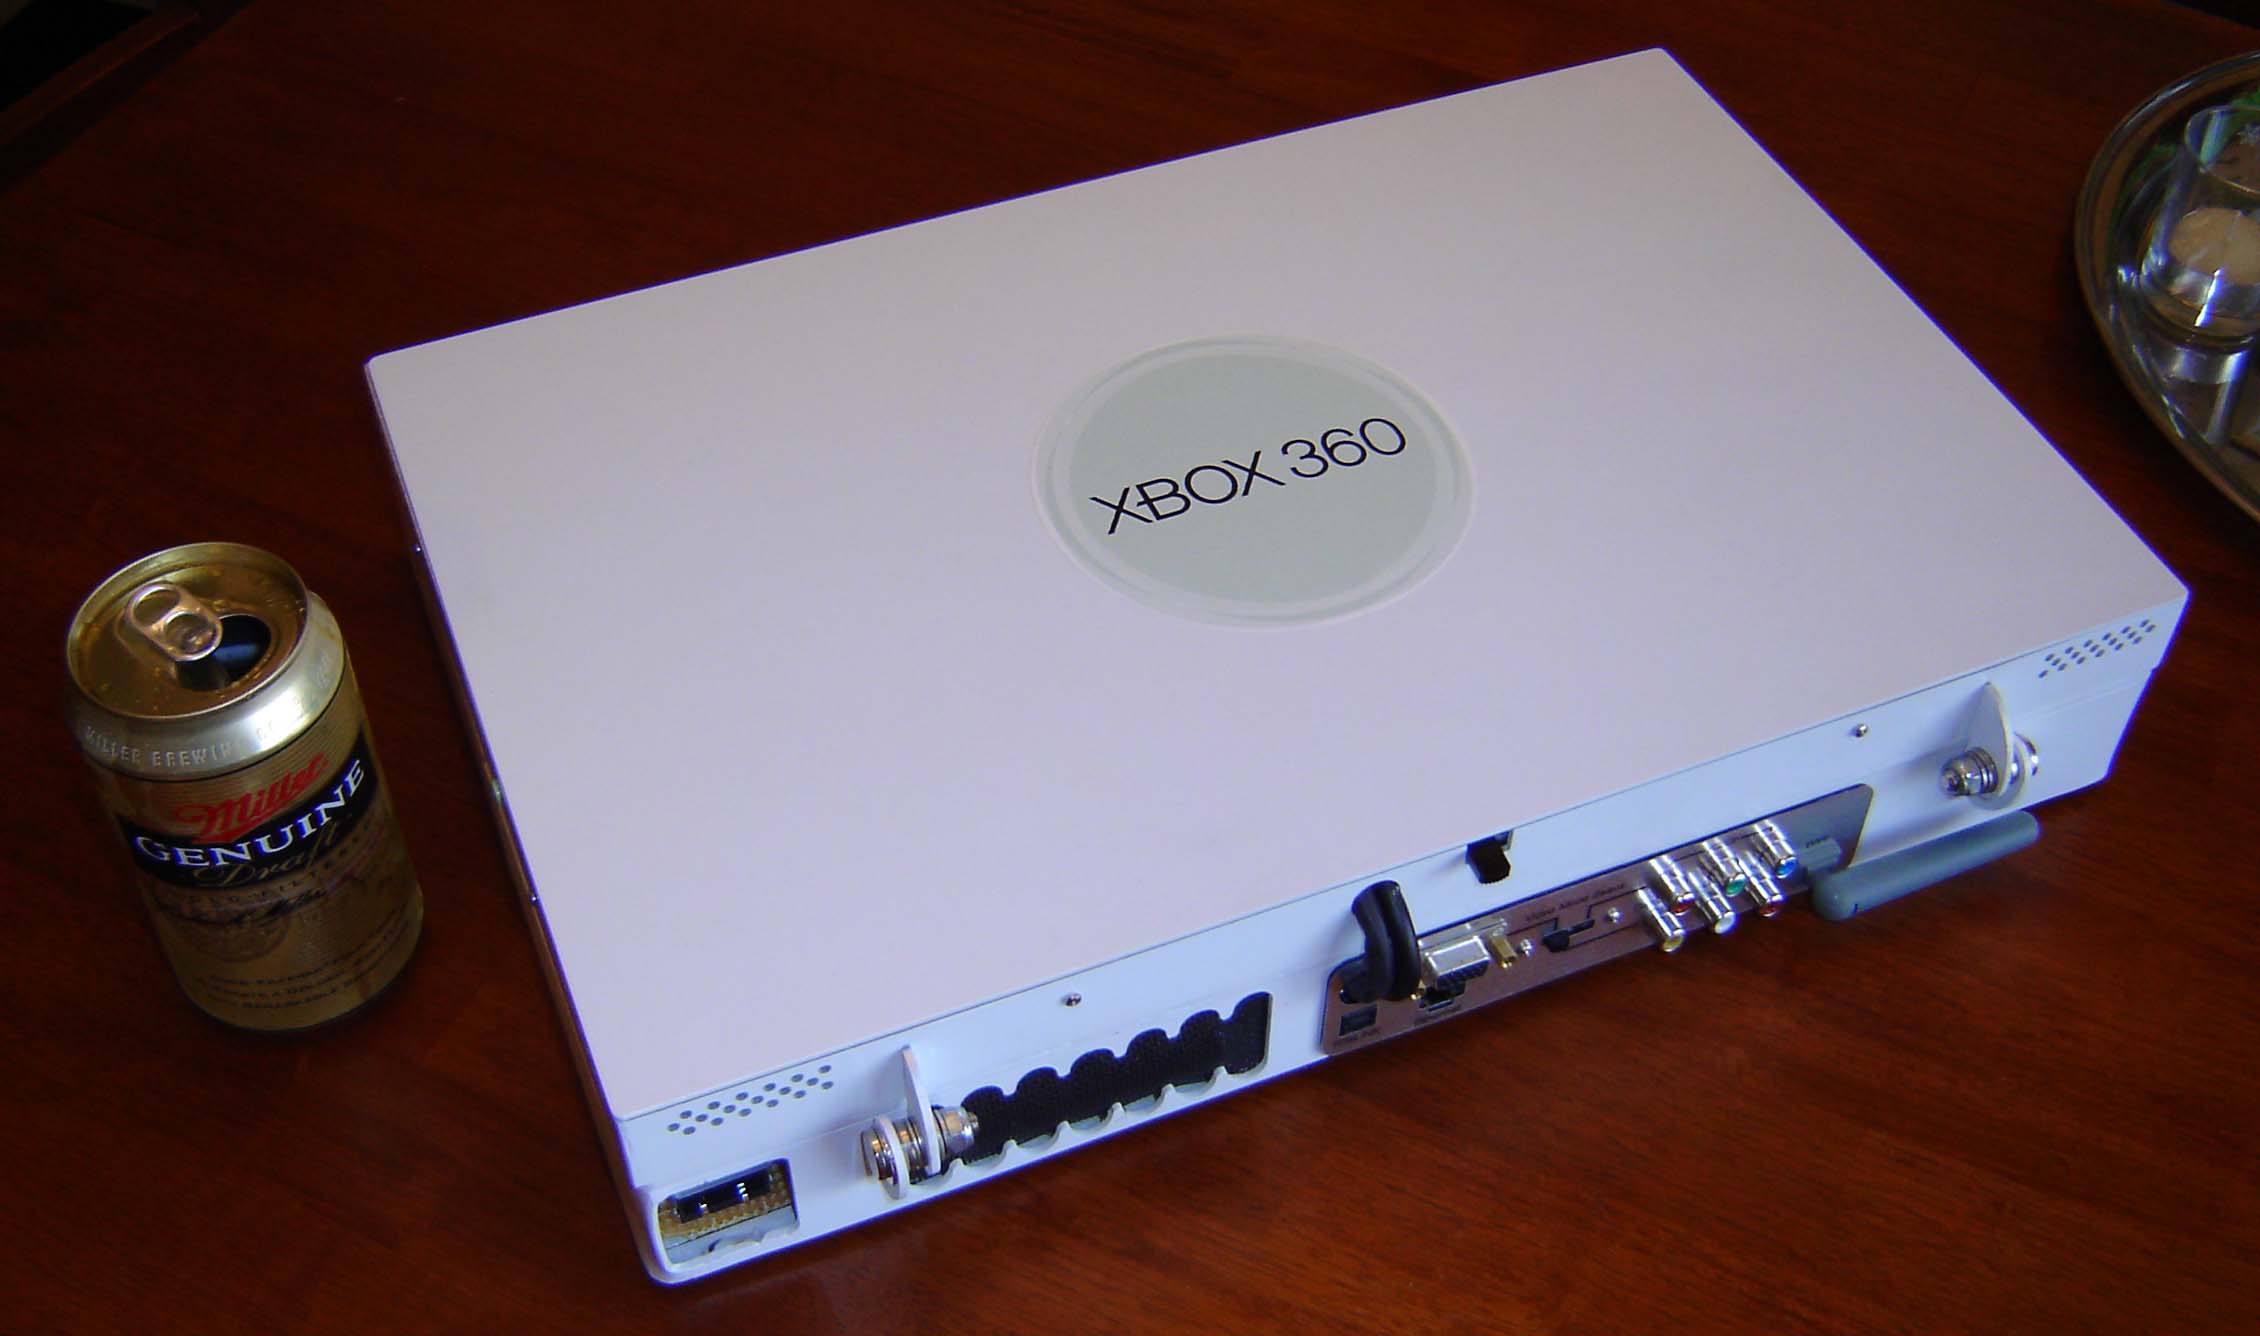
Xbox 360 laptop, closed on table, with beer can next to it for size reference.
Click image for larger version.
– Videos –
Here’s a video of the Xbox 360 laptop running with the enclosure plates removed. I tried to zoom in so you could see water rushing around, but without bubbles it’s kind of hard to see. You’ll get the point regardless.
– Photo Pack –
Should you like to see original high resolution pictures of the unit I have prepared a “photo pack” Also if you write an article about this you can simply grab these photos without having to ask me to send them (just ask permission to re-use them)
Xbox 360 Laptop Photo Pack (local copy)
Xbox 360 Laptop Photo Pack (mirror 1)
Xbox 360 Laptop Photo Pack (directory unzipped mirror)
Conclusion
All in all this project took me just over 3 months to complete. That is a record, even the very first Atari 2600 portable I built, back when I was a nOOb, only took two months. But you know, what’s the point of doing things if you don’t keep challenging yourself? Resting on your laurels leads to… well, smashed laurels I guess.
I hope this “making of” hasn’t been too boring for you. Thanks for your time, have a swell day!
25 thoughts on “Xbox 360 Laptop (Original)”