
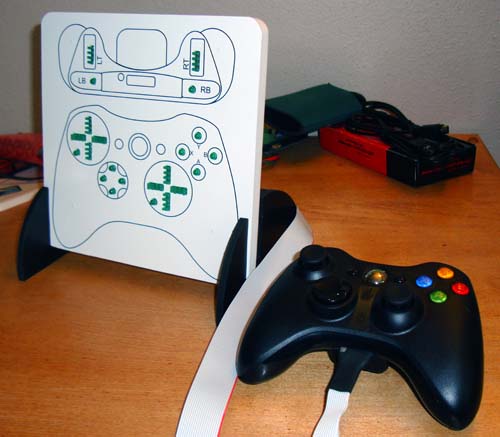
Controller Monitor Rev 4
This is the latest model of my Controller Monitors for Videogame latency testing. Currently I only have the Xbox 360 version, am looking into the PS3.
Unlike previous models, this unit has a microcontroller which offers several advantages:
- Very precise control of analog stick representations. Tweak the firmware to make it as sensitive as possible.
- Configuration menu, where you can calibrate your controller.
- Debug information via the serial/USB plug.
- Set external LSTTL level triggers based off certain inputs.
- Provides 1500+Hz of resolution.
USAGE
The unit runs off of the Arduino-compatible chipKit Uno from Digilent. It comes pre-programmed and configuration to your controller, ready to use. But the real value comes from customizing the code to suit your specific needs as you test different aspects of your game.
To program it:
- Obtain the customized Arduino IDE from this location: https://github.com/chipKIT32/chipKIT32-MAX/downloads Please note you need this, not the standard Arduino IDE.
- Download the latest version of the firmware from my site here: monitor_rev_4a.zip
- Start up the Arduino chipKit IDE and load the file “Uno32_Controller_monitor.pde”
- Under “Tools” and “Board”, select chipKit Uno 32 as your target device.
- This program references a file called “config.h” where the variables are declared along with constants. Open “config.h” with the Aduino IDE or a text editor.
- The first 8 constants refer to the sensitivity of the analog sticks in each of their 4 directions. The lower the number, the more sensitive they will be. However, too low and the first LED of a direction may “stick on” due to the fact that analog sticks rarely ever completely self-center.
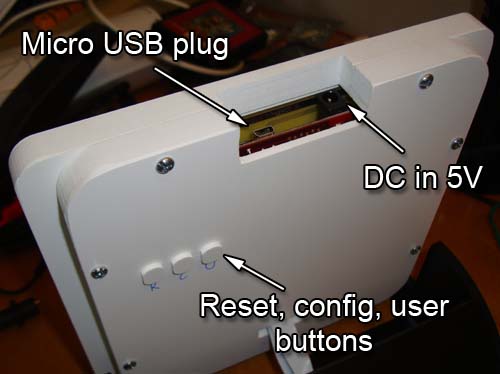
- Analog 0-5, 3.3v and ground are all attached to the output header (inside the case, below the “Benheck” text). You can define these pins as outputs in the firmware, and use them to trigger external cameras, sensors, dataloggers, etc.
- You will also notice the program has a 19,200 baud serial driver. Click on “Serial Monitor” in the Arduino IDE to see the output of the device or during configuration (explained below). It is not recommended to actually output serial data during testing as it is a slow process that will affect your latency.
- Once you’ve made your changes, connect a USB cable from the computer to the monitor and click Upload. This takes about 20 seconds. The unit does not need to be plugged in during this as the USB can provide power.
Note: If program does not compile correctly, add this file wiring_shift.c to this IDE folder under: /hardware/pics32/cores/pic32.
After programming the EEPROM is wiped so you’ll need to reconfigure the baseline analog readings that were stored there. (You can also do this at any other time you please as well)
- Plug the Xbox 360 controller into the monitor and turn on the controller by holding down the Guide button. It does not need to be linked to an Xbox 360, so if the ring of light continually blinks, that’s fine.
- Attach the controller monitor to your computer using a mini-USB cable (the kind digital cameras, cell phones and the PS3 uses). You don’t need to use the wall power supply here as USB will power the controller monitor.
- In the Arduino IDE, click on the “Serial Monitor” icon to open it and set to 19,200 baud. You will notice starting the Serial Monitor causes the controller monitor to reset itself.
- After it reboots, the lower red light will come on (no config data warning) and there will be a message on the serial monitor. Press the center button on the back, CONFIG. Top red light will come on to indicate config mode active.
- Follow the instructions that appear on the serial monitor. Basically we’re storing the baseline and maximum values for each of the analog controls.
- Once finished, press A and the monitor will store the values to its EEPROM. These values will now be loaded upon every boot.
The controller monitor is ready to go! Here’s a video in which I do this procedure and talk about the unit:
Ordering a Controller Monitor
This newest model Controller Monitor is now for sale and is built on a per-order basis. The current cost is $900 + shipping. This includes the internally modified Xbox 360 game controller, 8 foot cable, the Controller Monitor itself and a 5 volt power supply. Ordering procedure:
- Submit your company information for me to draw up an invoice for.
- You will be sent the invoice as well as my W9 if required.
- Pay via check (preferred) or Paypal.
- Turnaround time is typically 2-3 weeks.
Please contact me at benjamin.heckendorn@gmail.com for more information or to start an order. Thanks for viewing this product and I hope it can provide useful data for your game testing needs!
Upgrade Information
A large part of the unit cost is the intricate wiring on the customized controller. If you are an existing Controller Monitor customer, your controller can be made to work with this new system with a few minor tweaks, thus allowing you to upgrade your system at a reduced price. Please contact me for details.
One thought on “Controller Monitor”