

(Scroll down to find Usage Instructions and Command List)
This is the new Controller Monitor for testing the latency of Xbox One game input. Data is collected directly from the buttons (before any processing in the controller, wireless communication, or the game system itself) What the user is doing is displayed on the Controller Monitor, and this can be compared to the output on your display, demonstrating the amount of latency.
One great new feature is a light sensor for Time-Of-Flight detection. To use:
- Code your game to display a square with black-to-white transition upon a trigger or face button (XYAB) being pressed.
- Place sensor over the black square on your display.
- Plug a micro USB cable into the monitor. This both powers it, and gives you serial data (use any terminal program, with CR+LF enabled)
- Select which button to detect on the Controller Monitor. You can detect 3 stages (slight pull, middle and full pull) of either analog trigger, or XY A or B.
- When user presses the indicated button / pulls triggers specified amount, the Monitor times how long it takes for the black-to-white transition to appear on the screen in milliseconds, microseconds and average microseconds.


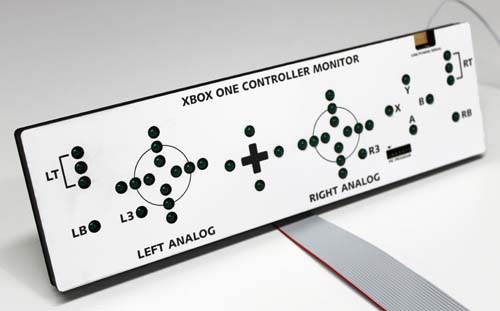
The design of the Monitor has changed as well. It is now an elongated rectangle so it can placed closer to the display or right below. If you’re using a high-speed camera, this makes it easier to frame your shots.
There is a 6 foot ribbon cable between the controller monitor and the modified controller itself. The cable can be detached from the controller. The headphone adapter cannot be used with the cable in place.
Controller Monitor Specifications:
- Dimensions: 11″ x 3″ x 1/2″ (280 x 83 x 13 millimeters)
- LED indicator color: Green
- Digital Button Transition Time: (LB, RB, L3, R3, D-pad, XYAB) 100 nanoseconds
- Analog Indicator Speed: (Triggers, Analog sticks) 4000Hz
- Power supply: Micro USB cable. Can be powered off the Xbox One itself, via a computer or USB cell phone charger.
- Control/communication method: Serial terminal via COM port
- Cable length: 6 feet (1.8 meters)
- Cost: $900 US + shipping. Average turnaround/delivery time: 2 weeks
To order the Xbox One Controller Monitor, please contact me at benjamin.heckendorn@gmail.com
XBOX ONE CONTROLLER MONITOR USAGE INSTRUCTIONS
Setup:
- Turn on the Xbox One Console and your Customized Xbox One controller. (Controller must be synced to console in order for analog controls to register)
- Plug the Monitor’s ribbon cable into the base of the controller, aligning the silver markings.
- Power the monitor via a USB mini cable. You can plug this into the Xbox One, or a PC/Mac to use the Serial Commands (recommended)
- On boot, the monitor will average out a baseline value of both Analog Sticks. Be sure not to move the analog sticks as the monitor boots (this only takes a second or two)
- All the analog indicators will flash solid, then go dark. Monitor is now ready.
- If you plan to use it, plug the Optical Sensor into the back of the monitor.
Normal Functions:
- The Monitor “sniffs” button signals at their mechanical source, thus you can see what your user is doing immediately.
- You can record the Monitor alongside the Game Display at a high frame rate to determine lag between use button presses and game response actions.
- The digital buttons indicators (LB, RB, ABXY, D-pad, L3, R3) have a response time of a few nanoseconds.
- The analog stick indicators update at approximately 4000Hz.
- The analog triggers are pulsed internally by the controller at 125Hz, making this also the maximum resolution of the Controller Monitor. This also results in a slight “flickering” of the Analog Trigger Indicators.
Time of Flight Detection:
The monitor can time how long it takes between a user pressing a button and a black-to-white transition onscreen.
- Code your game to display a black square in the corner of the screen, larger than the sensor (about 1.5″)
- Place the sensor over this. The foam should help “seal” it shut from ambient light.
- Upon an analog trigger pull, or one of the 4 face buttons being pressed, your game should make this square should turn white, then black again when button released. (See below for how to select which buttons to monitor)
- The monitor will report over the USB com port how many milliseconds and microseconds it took for the transition to occur. This gives you a number quickly, without having to count frames.
- Once a button is pressed, the monitor will DO NOTHING until it detects a black to white transition. Therefore, if the sensor is not plugged in, or not placed over a black to white square, the monitor will “hang” until it sees something.
- If it does hang, simply expose the sensor to ambient light, or tap RESET on the back of the monitor, making sure you leave the analog sticks centered as it reboots.
Serial Commands:
With a USB com port terminal open, type HP to get a list of commands. Most of these commands affect the Time of Flight settings. They are described below.
(All commands are 2 character, not case sensitive)
Setting which buttons are monitored for Time of Flight measurement:
- L1 – Slight pull of left trigger
- L2 – Middle pull of left trigger
- L3 – Full pull of left trigger
- R1 – Slight pull of right trigger
- R2 – Middle pull of right trigger
- R3 – Full pull of right trigger
- FB – Any face button A B X Y
Other commands:
- XX – Disable timers (default, boots in this mode)
- AV – Average analog sticks. Same thing it does on boot. Be sure not to touch them during this time.
- RS – Resets time-of-flight sample average.
- HP – Show command list
Troubleshooting:
Analog indicator lights seem flaky, messed up, non-responsive?
- Be sure Xbox One controller is turned on and synced to Xbox One control BEFORE attaching and powering up monitor.
- Check ribbon cable is fully inserted. Check no pins on it have been bent.
- Tap RESET on rear of monitor to re-average the analog indicators or re-establish connection to controller.
Trouble connecting via USB?
- Download the drivers for the USB device.
- On boot (first USB connection) it displays a message that you might not even see over the COM port.
- The best way to check if you’re connected is to type HP into the serial. It should return the command list and you’re good to go!
- When plugging monitor into a PC/Mac, listen for the “device connect” sound. If you do not hear this, try tapping RESET on rear of monitor while it’s still plugged into your computer.
Ribbon Cable Problems
- Parallel data is critical for getting the best measurements. This requires a 20 connection ribbon cable and header.
- The header pins are the most fragile part of the system. For best results, leave the ribbon cable plugged into the controller when possible. This protects the pins from being stepped on, crushed, etc.
- If pins do get misaligned, you can carefully bend them back with a pair of tweezers.
I want to flash my own custom code to the Monitor?
- Get MPIDE – the Arduino fork that is used to program the PIC32 inside the monitor
- Download most current controller monitor code
- In the MPIDE under Tools, select Fubarino – Fubarino Mini
- With your code ready, connect the Monitor and hold down both PROGRAM and RESET
- You should hear the OS “disconnect” sound.
- Release RESET but continue to hold PROGRAM for a few seconds longer. It is now in BOOTLOADER mode.
- Click UPLOAD on MPIDE to send the new code.
One thought on “Xbox One Controller Monitor”