
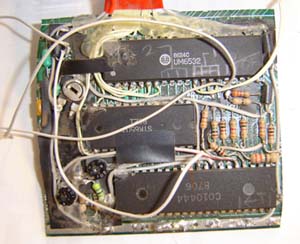
A very heavily re-wired and hacked Atari 2600 Junior motherboard.
Our tale begins back in the fall of 2000. I had just started up my website for building the original VCSp and people were emailing en masse with their support. So I thought “Wow, this is cool. I should make another!”
For some reason I choose to use an Atari 2600 Junior rather than a more standard “4 switch” I thought the insides would be smaller, however they weren’t. But I started hacking it up anyway. I destroyed about 10 (yes, TEN) 2600 Juniors while working on them (Keep in mind my skills were quite primitive back then, as opposed to now where I’ve reached about the Bronze Age) Finally I shrunk one down as seen above, it’s about 2.8″ x 2.6″. There’s a .5″ x 1″ sub-board required as well (it contains the crystal) but that’s easy to tuck anywhere, such as around the screen.
Next up was designing the case. I wanted a flip-up screen that would use reflected light to shine through the back of the LCD, but my mechanical drawing skills were crap compared to now. Additionally I didn’t have access to a laser engraver so I couldn’t build parts accurate/small enough for the mechanism. It’s a simple mechanism but a small one, and that was the problem.
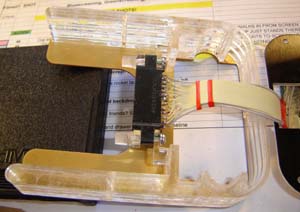
The flip-up screen in the final unit. Two plastic “pistons” are pressed forward by springs which lifts the screen. A spring-loaded button (center) released the teeth allowing the screen to open. One spring would have been enough but 2 makes it pop open faster, like a James Bond gadget!
So the Vagabond guts (the 2600 JR) literally sat on my workbench covered by other crap for over 4 years. Finally a few months ago I was taking inventory of what junk I had left over from doing my book and came across an unused 2.5″ TFT screen and of course the Vagabond guts. Since the screen cost me money and I was getting tired of looking at the Vagabond guts I decided to finally build a portable out of it.
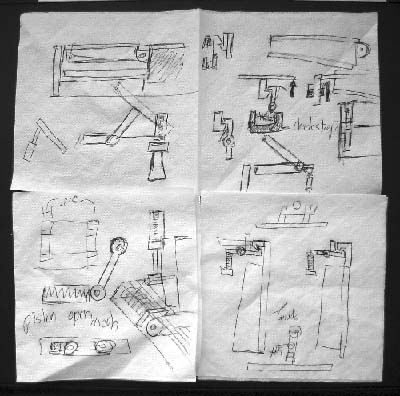
Seen above are the actual bar napkins I used to design the spring-loaded screen-popping mechanism. I get sick of using computers so sometimes I hit the bar and start scribbling out ideas before drawing them out “technically”. It took… I think 2 MGD’s for me to figure out how I would do the screen. (I was careful not to set them on the napkins lest my designs be ruined by condensation) This was the trickiest part of the case, the rest was rather easy to design.
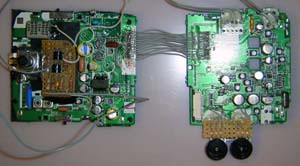
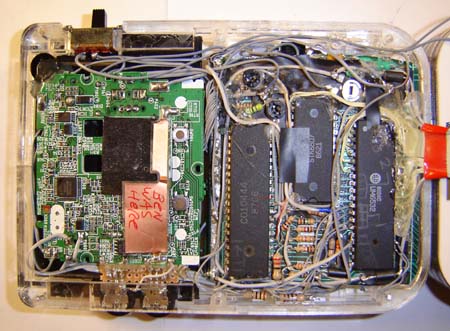
Casio EV-580 (or maybe it was a 670, I can’t remember) guts
Pictured above are the pocket TV’s guts. For some reason they’re 2 circuit boards. This was a pain but also gave me a little freedom to move stuff around. I rewired them together (since the original ribbon cable was too long, or I didn’t it or some other reason) and extended the brightness/volume knobs. The paddle potentiometer was placed on the left TV board, as well as the crystal circuit for the Atari.
I designed the case to be made from .225″ thick clear acrylic pieces stacked atop each other. Sometimes I have lots of free space in my cases (such as the Exodus or the last CNC NES) but this one I wanted really small, compact and tight.
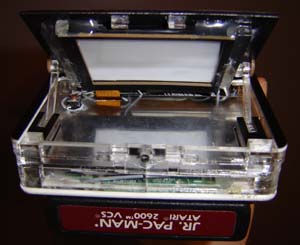
Here’s the back of the unit, it’s 1″ thick. It contains the game cartridge and Lithium-Ion battery. Another holdover from my original Vagabond plans was to have the cartridge slide down the back like a Gameboy. Yes, I’ve accomplished that with a lot of portables since but it still needed to be a feature on the Vagabond.
The front of the case is .875″ thick and contains a lot of stuff – the LCD screen, the flipping mechanism, the TV’s 2 circuit boards, the power regulator, power switch, headphone jack, the controls, the paddle knob and the Atari 2600 guts themselves. Luckily everything fit as planned (see above) I was quite proud of the “density” of the unit, it’s literally jam-packed. (Portables, like nature, abhor a vacuum)
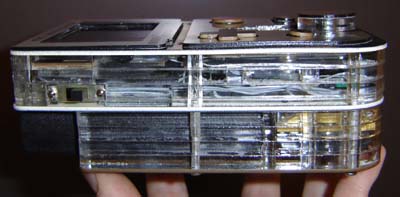
Here’s a profile view of the Vagabond 2000. This unit certainly isn’t the thinnest I’ve made but the X Y size of it is one of the lowest (5.75″ x 4″) The tact switches for the controller buttons are actually inside the buttons rather than under them. That saved me a good .25″ of depth right there! The paddle knob is also low and sleek. One “holy grail” of Atari design for me has always been “will fit in a coat pocket!” (Useful because winter is our favorite 10 months of the year in Wisconsin)
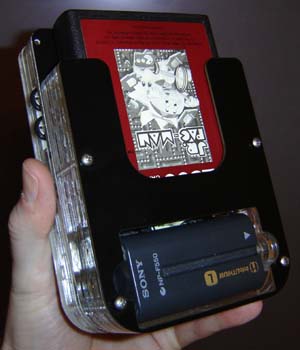
Rear of unit, with handy “hole-to-display-cartridge-label” and battery. (This allows onlookers to see what game you’re playing – great for picking up chicks if you plug in “Frogger”, the chocolate of videogames)
So that’s the story… of how a once forgotten hacked-up Atari made its way back into the world. (And how I got rid of some stuff that was laying around)
Click Here Vagabond 2000 Demo for pulse-pounding video of the Vagabond’s screen popping open!