
 |
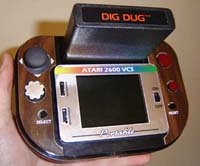
Atari 2600 Portable, CNC-built Chapter 17 of the book Build a portable Atari 2600 system with a 3″ TFT display, built-in battery pack, compact design, PS1-style joystick, paddle control and Player 2 joystick port. This project can be constructed by using CNC-cut parts and other hobby materials. You’ll also need a soldering iron, X-Acto knife, wire, screwdrivers and other common tools. |
Construction Resources
Once you’re ready to begin work on this project the links and information below will be of much help. All links open in a new window so you can easily come back here during your online part collection. This information is all contained in the book of course, but the book itself doesn’t have internet access 😉
Major Project Components
The two primary components of these projects are the original game systems, display and Sony Infolithium Type L battery. Below are the correct models to use, with a reference photo and easy-to-use automatic eBay search link.
| Console model: | 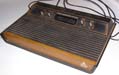 Atari 2600 4-switch |
Automatic eBay search for this item (Atari 2600 4-switch) |
| Screen model: |  Casio EV-680 Pocket TV |
Automatic eBay search for this item (Casio EV-680 pocket TV) |
| Battery model: | 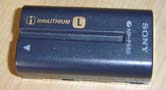
Sony Infolithium Type L series battery – NP550 or better |
Automatic eBay search for this item (Type L battery) The higher the NP-XXX number the better. 960 is the best, 550 minimum. Automatic eBay search for Type L battery charger Be sure it’s for a “Type L” battery, or a multi charger that can fit a “Type L”. Other 7.5 volt batteries will work, however you may have to modify the project to get them to fit. |
| Misc. | PS1 Dual-Shock controller (for joystick) |
Automatic eBay search for this item (Dual Shock controller) |
Electronic Components Lists and Part Numbers
I’ve separated the electronics parts list into what you can get online from Mouser (www.mouser.com) and what you’ll still need to find at Radio Shack. Therefore the two lists below are the same as the single list in the book. You’ll still need everything from both lists, but the more things you can get online from Mouser the cheaper it’ll be.
Unlike Digi-Key, Mouser’s website has no minimum order so it’s handy for the experimenter, plus they have good prices. Please note that the items for modding the Casio TV screen (10 ohm resistors and white LED’s) are also included on this list. Using this list you can easily copy/paste the part numbers into Mouser’s web site (or Radio Shack’s, below) to complete on online order. Sure beats typing!
The appropriate battery can be found by using the eBay link above.
Atari 2600 CNC built
Electronic Parts List from Mouser:
| # | Part Name | Quantity | Vendor | Vendor Part # |
| 1 | 6mm Tact Switch | 4 | Mouser, Inc. | 101-0161 |
| 2 | 10 ohm resistor (screen mod) | 1 | Mouser, Inc. | 660-CF1/4L100J |
| 3 | Resistors 4.7Kohms | 4 | Mouser, Inc. | 660-CF1/4LT52R472J |
| 4 | T1 size white LED (screen mod) | 2 | Mouser, Inc. | 606-CMD204UWC |
| 5 | 7805 regulator | 1 | Mouser, Inc. | 512-KA7805AETU |
Below are the Radio Shack electronics parts. Mostly the bigger, more mechanical stuff, plus the PC boards.
Atari 2600 hand built
Electronic Parts List from Radio Shack (stores or online):
| # | Part Name | Quantity | Vendor | Vendor Part # |
| 1 | Phono jack | 1 | Radio Shack | 274-246A |
| 2 | Male polarized connector (4 positions, Molex Type) | 1 | Radio Shack | 274-224 |
| 3 | Heat sink | 1 | Radio Shack | 276-1368 |
| 4 | SPST submini Slide Switch | 1 | Radio Shack | 275-406 |
| 5 | 1 meg ohm linear-taper potentiometer | 1 | Radio Shack | 271-211 |
| 6 | Male 9-pin connector | 1 | Radio Shack | 276-1537 |
For remaining materials (screws, glues, plastics) please see the book.
Support Files
Contained in this single ZIP archive are all the files you need for this project. See book for more details. Includes templates, patterns and printable decal graphics.
Download Atari2600_CNC.zip
Changes, Updates and Error Corrections
This section contains information on things that may have changed since the printing of the book, corrections to any errors found and better ways of building the projects, if applicable.
New and improved composite video mod for the Atari 2600
NOTE: Now includes update for different model Atari 2600 4-switch boards.
I came up with this as I was working on a new project. Gives a cleaner picture with less interference. Also isolates the sound circuit from the video. If you’re just modifying an Atari for use with a normal TV it also increases compatibility (with newer sets especially)
Click here to visit the “how to” page for it.
Easy way to bypass the “Stupid 8-DIP IC” found on some model Atari 2600 4-switch boards.
In the book I suggest hacking the 8-DIP IC off the board, or cutting a small section. That’s all well and good but since then I’ve found you can “remake” that circuit using only a capacitor and resistor. It’s a lot easier!
Click here to visit the “how to” page for it.
Back to “Hacking Videogame Consoles” main page