Our awesome band “Power Supply”
I really enjoy Rock Band, just yesterday some friends and I actually did that “Endless Setlist” thing (FYI it takes about 5.5 hours, including breaks) but the strummer on the Rock Band guitar does leave something to be desired. At first I appreciated the fact that it didn’t click, then realized it made high-speed accuracy harder.
Being, well, myself, I decided to get in there and see if it could be improved. What follows are the easy instructions to do it yourself and finally shut up your friends who swear by that Les Paul from GHIII (like Jones does).
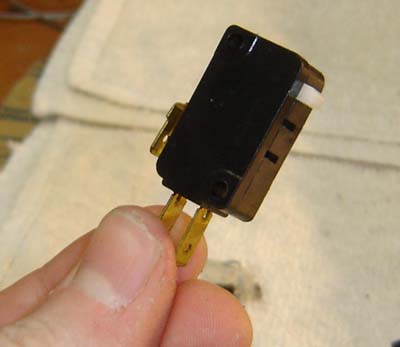
Let’s start with parts. All you’ll need is a pair of Cherry-type microswitches. I had some laying around because they’re the same kind used in pinball machines & arcade joysticks, though they are often used as limit switches in industrial applications. They push effortlessly and have a very positive clicking sound as well, making them a great choice for this project. Find one without a lever or roller, as shown below.

A cherry switch.
Here are some links to find these things.
It seems they’re actually cheaper from places like this than from Mouser, Digi-Key etc. Of course you can just do a search for “Cherry switch”, micro switch, or arcade-style switches. Not too hard to find, so I’ll leave you to that.
Let’s get started, and don’t worry – hot glue will be involved. First, take apart your Rock Band guitar. There’s a load of screws on the back holding it together, just keep in mind the 4 long ones are where the neck attaches and the 2 short ones are over on the right where the unit is a bit thinner. You won’t need to remove the white front faceplate or take apart the neck.
At this point Xbox 360 owners will realize the battery compartment is not even hooked up to anything. I’m assuming they’ve used the same injection molds for the 360 and PS3 version, and of course the PS3 version is wireless thus the compartment. Oh well, maybe us 360 owners will get it next time.
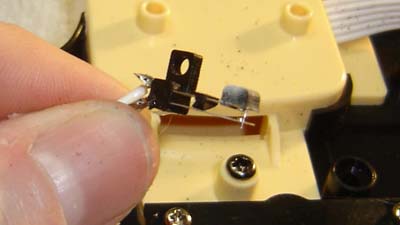
Once inside remove the two leaf switches from either side of the strum bar. Notice how they are kind of small and flimsy, this probably accounts for some failures.

One of the leaf switches in question.
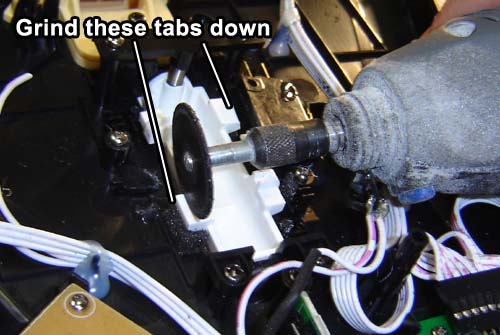
OK next you’ll need to Dremel (which is now a verb) out some plastic so the cherry switches can fit on either side of the strum bar. Grind down the black plastic of the case on the sides of the bar, and also reduce 2 of the white tabs opposite each other as shown in this picture.

The Dremel once again “gets in there”
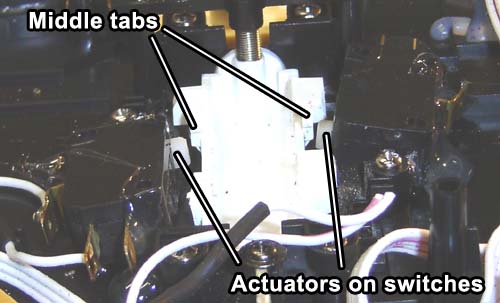
Now place the cherry switches on either side of the strum bar so their actuators can be depressed by the little white tabs in the middle.

How to place the new switches.
For best results it should sort of resemble a “V” shape in that the actuators on the switches are tilted up slightly so there is a smooth contact when the tabs hit them. I’d suggest holding each switch in place while strumming with your other hand, then once it feels good hot glue the hell out of the switch so it stays put. Try for the tabs just barely touching the actuators when the strum is not pressed, yet make sure you’ll still able to push the strum bar quite a ways before the main body of the switch stops it.
Finally connect the new switches to the original wires that were on the leaf switches. Depending on how you place your new switches you may have to extend the wires for the “down strum” switch (the one on the right), the left switch wires should be plenty long enough. The extension I did can be seen as the green wires on the right, I even used heat shrink tubing so I wouldn’t look like a noob.
![Now you're ready to [literally] rock Now you're ready to [literally] rock](https://benheck.com/Games/Xbox360/rb/finished_small.jpg)
Click here for larger version, which allows you to see more Dremel dust
The 3 tabs on the switches are labeled Common, NO (normally open) and NC (normally closed) Be sure you connect the 2 wires to Common and NO, as shown above. You can also see in the above photo why we ground down the side tabs on the strum bar, to keep them from hitting the switches. You may find bits of foam under these tabs, which is a cushion or something I reckon. If you feel you need this simply put the foam under the non-ground-down tabs.
Well, that’s pretty much it. You can now put the guitar back together and pound out those endless strumming songs such as “Paranoid” and – ug – “Highway Star” better than before. (As well as slumming songs like “Creep” and “Say it Ain’t So” for more fans)
However while you’ve got the guitar open you might want to replace / shore up / improve the spring on the whammy bar as well. Mine broke and it’s not surprising considering that the spring is about as wimpy as one you’d find in your average pen.
Now if you’ll excuse me I’ve got to get back to rocking with POWER SUPPLY!!!

BEN!!!! Your site is alive and well again!!! Huzzah!
Ha ha! Nice band name.
I just can believe that you played for 5.5 hours! I bet your drummers shins were on fire by the end.
nice
now i get some Ideas To create a strummer
on my guitar hero guitar
http://www.youtube.com/watch?v=wf-juutGC2g
Psh, you guys have a band, but none of you have an account on RockBand.com? That’s preposterous!
I have one! Under my “jarjarisgod” handle for my band “Maverick and the Danger Zone”. LOL
I think you have the first version because they tried to fix it (i have the newer version and it still sucks), and its different on the inside i think your fix will still work, maybe with a few minor changes. and if you have the new version, you have to take off the white faceplate because there’s two screws underneath it.
Thank you for this great piece of advice. I only recently discovered your website and I think its great. I used different switches but they work great.
You recommend replacing the whammy bar spring… and my whammy bar spring just so happens to have crapped out on me. What sorts of springs do you suggest using as replacements?
It really should be “Maverick and the Dangertones”
even cheaper place to get cherry microswitches is lizardlick.com. just email them and ask them if they can send you 1 or 2 microswitches in a big envelope or something and save yourself $$ on shipping
Ben,
Nice mod.
Get yourself one of the diamond blades for your dremel. I happened to have one in one day when I went to trim some plastic, and it’s a bit improvement over the abrasive ones both in cutting speed and final finish.
I was also wondering a good replacement spring for whammy bar I really don’t care for rubber bands or the girlfriends hair ties. They work for temp fix but I really would like to get a new spring.
i love how your ideas are better than the manufacturers